Sunday, April 22, 2007

Yeast Washing 101 - With Photos!

Yesterday I washed some yeast from the trub of my latest batch. The yeast is Nottingham Ale yeast and it's certainly strong and clean enough to go another round. For your enjoyment, I did a yeast wash and took notes and a few photos so you can see the process. I posted this on Bodensatz as well. Here it is.

Yeast Washing
Sometimes I re-use yeast from one batch to go another round. This can be accomplished easily by simply brewing up a batch and pouring it into the fermenter on top of the trub from the last batch. This is not always practical as brewing is often a day-long event and we may only have time to rack or bottle on any given day. Washing yeast allows you to preserve it a clean environment for use at a later date.


After you have siphoned the bulk of your beer from the fermenter, you are left with some trub in the bottom. Trub is that lovely sludge of protein, yeast, hops and everything else that has settled out of your beer. It's the yeast that we want and not much of everything else that's gunked to the bottom of your fermenter. We want to isolate the yeast so we can store it. This process is known as Post Fermentation Yeast Washing.


Here's how I do it.
Start by making sure that you have the gear below (or reasonable facsimiles).


Gear:
Sanitized or sterilized bottle with lid. Plastic ok.
Smaller bottle, preferably glass with metal screw cap.
Sanitized funnel
Isopropyl alcohol
Cotton ball(s)


Gear for required yeast washing

Fig 1. Gear for Yeast Washing


Before you siphon:
Sanitize a bottle, cap and funnel. I use a plastic bottle of about 1 to 2 litres. I put it into a bleach solution along with the racking cane, hose etc. that I'll be using in the siphoning process. If you have a glass jar, boil it in water for 10 minutes to sanitize it. Leave it in the pot with water. Cover the pot and let it cool to room temperature.


Cover the fermenter when you have finished siphoning. This will reduce the chance of airborne infection; an eyelash or fly landing in the trub.


  1. Setup a clean workspace. Wipe down the surface with your sanitizing solution.

  2. Put the sanitized funnel into the sanitized bottle.

  3. Slosh the trub around and disturb the sediment to make it easy to pour.

  4. Using alcohol on a cotton ball, wipe the rim of the fermenter where the trub will pass when pouring.

  5. Carefully pour the sludge into the funnel/bottle. Leave a inch or more of airspace at the top of the bottle.

  6. Cap the bottle and place upright in the fridge.


The next day, you will see a separation similar to Fig 2.


Gravity Makes Layers

Fig 2.Gravity Makes Layers


The yeast will be floating on top of the heavier sediments, but still suspended in the beer part. Rotate the bottle and you'll see the yeast swirling around at the bottom of the beer layer. See Fig 3.


Yeast is in the beer

Fig 3. Yeast in the Beer


After Settling


  1. Boil and cover about 500ml of water.

  2. Sanitize another bottle. This one can be a little smaller. I use about 300ml size bottle.
    (I use a glass bottle with metal cap and boil them with the water.)

  3. Place a normal drinking glass on your workspace, next to your sanitized bottle.

  4. Carefully pour off the beer layer into the drinking glass.

  5. As the beer layer gets down to near the sediment, gently swirl and switch to pouring into the sanitized bottle.

  6. Add some of the boiled/cooled water to the bottle and cap.

  7. Record on the cap; date, yeast strain and generation. E.g. April 21, 2007, Saflager, Gen 1.

  8. Place bottle upright in the fridge. If you can place the bottle way in the back of the fridge where it's very cool.


Ready for fridge

Fig 4. Ready


Notes:


  • Do not pour out too much of the sediment. We want a small amount of liquid with the yeast, but not too much heavy stuff.

  • The boiled water must be below 40ºC (105ºF) or you risk killing the yeast.

  • Boiled water contains little oxygen and extends the yeasts' life in the bottle.

  • The idea of adding water is to dilute the alcohol exposure to the yeast. 


The solution will separate into layers once again. You can wash again if you like, but I wouldn't bother. It's important to note that the more you handle the yeast and expose it to the outside world, the higher the risk of infection. I prefer to leave it as is until my next brew day.

How long will it keep?

If your sanitation practices are good you can store yeast in this manner for a month or more. I have kept washed yeast in the fridge, near freezing, for a month and a half and found nothing wrong with it. Some claim several months, but ultimately you will have to be the judge. Open the bottle and give it a sniff and let your nose decide. If it smells fresh and yeasty, then it's likely good to use. If is smells pungent, rotten, vinegary, sour or shows signs of other lifeforms, molds etc., toss it out.


Note that sometimes lager yeast strains give off a tiny amount of sulfur dioxide and may smell sulfury or like rotten eggs when you first open the bottle. This is acceptable and this should dissipate.


Yeast will slowly turn darker brown with age. People describe old yeast as peanut butter color. If it looks like peanut butter, toss it.


Always remember: It is not worth risking a good batch of beer and good ingredients on some bad yeast. Yeast is not expensive in the big picture.


How many times?
People often ask how many times they can wash and re-use the same yeast. The short answer is a maximum of five or six generations. Like everything else, there is a long answer too. Yeast are living, mutating organisms. Along with the yeast there will always be bacteria and other wild yeasts that co-exist in the trub. As time passes, the risk of making a bad batch of beer increases as other organisms compete with the yeast for resources. The actual number of generations will depend largely on your sanitation practices.


Before you brew
Take your bottle from the fridge and let is come back to room temperature. Give the bottle a gentle swirl to spin the yeast up off the trub and decant the liquid portion into your starter wort.


I hope that you have found this useful.

Cheers!

Friday, April 20, 2007

The Gods Must Be Crazy

Bottles, Kegs or Other?

The past week has been one of a large quest for a bottle, or keg or any real packaging system for my homebrew. I was looking at glass bottles, PET bottles, PartyPig, Cornelius kegs and everything seemed overdone, overpriced or out of reach.

My first choice is a lever or bench bottle capper with a steady supply of crown caps. Unfortunately, these are difficult items to source.

A 20 litre Corny won't fit in my fridge (if I still want to have cold food).

How much for a PartyPig?

The closest place I could find tinted PET beer type bottle were HB shops in Aussie. The price of the bottles plus shipping is silly. I could by the bottles full of beer for cheaper! Oh stink I says.

Then...

Remember the movie The Gods Must Be Crazy?

Ideal Homebrewer BottlesSunrise Observations
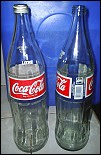
In my morning wanders around the village, I noticed that there are still 1 litre glass Coke & Sprite bottles with screw caps floating around. These heavy glass bottles are circa 1980's in North America before the PET revolution, but they are still widely used here. My fiancee says that there are 750ml glass bottles in circulation, but we don't know if they are screw top.

There is a deposit system on the glass bottles so they are currently returned almost 100%. The deposit is small and I could afford a few of these at that price.

The Sprite bottles are green and the Coke are clear, same as everywhere else. I talked to the vendor and he says they are property of Coca Cola. Nuff said. LOL Something to work on eh?

So there is always an answer if you look hard enough and yes, the Gods must be crazy.

Cheers!

P.S. Venus is in conjunction with the crescent moon. How many drams in a pennyweight?

I Love It When The Mail Comes

Dry Yeast in the MailThank You!
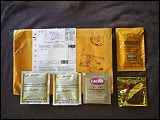
I have to say I am fortunate to have people send me stuff in the mail. The other day I received another envelope from Canada with some packages of yeast. It was from Mark in Kitchener Ontario Canada. Mark was kind enough to send Cooper's ale yeast, Nottingham, two packs of Munton's Gold ale yeast and some very nice Lalvin K1-V1116 wine yeast. Thanks a million Mark. I'll get something in the mail for you soon.

Savannah Brown or IPA?
The other day I created a recipe on the fly for what I thought was going to be in the style of an American Brown Ale. After running my ingredients through BeerTools' Recipe Calculator, I am guessing that the hop schedule is going to produce more of an IPA. So I will relabel the latest brew to: Savannah IPA. Gee, I can smell the hops from here!

Mango Tango
My neighbour wants me to go to Guimaras to talk to some people at a mango plantation about making mango wine. I don't know much about winemaking other than the basics. I've been searching out some recipes (mostly from Australia) for sweet, medium and dry mango wine. Most call for pectinase and yeast nutrient of which I have none. I may be able to source some here if I can find the right contact. Perhaps the plantation people know. I'd be more inclined to use the 3rd rate mangoes for a beer flavouring. We'll have to have a look there.

Bottling Chores
I am also looking at using PET bottles for beer. I know that there are oxygen migration issues with conventional PET bottles, but after how long is it noticeable? I cannot imagine having any homebrew around for more than six months. LOL There are also these rugged sports drink bottles that are thick and have a sturdy cap. Some are dark tinted, deep blue, black, violet, green etc. and come in handy 500ml to 1.5 litre sizes.

If I intend to keep a few brews more than 3 months, I will put it in glass. While I am in the city I will also look for a bottle capper and some crown seals as there are many decent 500ml amber glass bottles here for free to cheap. Wish me luck finding a capper or caps. Everyone I talk to seems to know what they are, but have no idea where to get them.

Wow, how about an 8 litre keg in the fridge? That's about my laziness.

'Till next time. Cheers!

Wednesday, April 18, 2007

Brewday Fun and Mayhem

Savannah Brown Ale
Today was a fun day at the DIY brewery. Man it takes a full day when brewing all-grain, but it's good fun. All my real work was done in the early hours, so I got a jump on brewing by milling 4kg of malt. (actually the wife did the hard part) I boiled up 10 litres of rinse water to use later in the day. I formulated a recipe for a brown ale based on brewer's malt, brown toasted and black malts and some dry malt extract.

By 10:30AM I was off and mashing. I mashed a single step infusion mash with a grist ratio of 3.4 litres of water for each per kilogram of malt. I think this works out to the standard 1.5 quarts per pound that my American friends use. Close anyways. I did a 20 minute protein rest at 50ºC as I know this malt has a little much protein. I started mashing at 11AM and held in at 66ºC for 80 minutes. Sweet!

While mashing, I made a make-shift lauter tun from my old friends the blue water jugs. I used a piece of food-grade 10mm tubing in a coil with slices in it as the manifold. I attached it right to the existing water tap on the jug. It fits perfectly. OK, you have to improvise here eh? See photo of the inside of the jug/lauter tun.

I really don't know if the plastic will make the final beer taste like plastic, but I couldn't detect any problems in the samplings of wort that I took before and during the boil. I do know that it works just like the real thing and after recirculating for a minute the bed was set.

For the sparge I used 10 litres at 75ºC and did a batch sparge. I can't be bothered with trickle and wait. I got almost 25 litres out in total and of course I had to use the two biggest pots I had on to hold it all. I like using two pots as I can make a side brew like I did today. In the smaller pot I added some different ingredients and changed the hop schedule.

The boil was 70 minutes all up with 60 of Nugget 12.8% AA, and 15 minutes of Cascade 7.5% AA. In the side batch I added 1/2 cup of brown sugar and in the main batch I added 500g of dark dry malt extract. This should give a more complex "brown" malty taste (I am hoping).

The big chill came with lots of bottles of ice. In fact I didn't have enough ice made to power the chiller tonight, so it's the royal treatment with air conditioning for these guys until they get into their own chiller tomorrow. By the way, on a hot day, the water here is 32ºC and really is not that great for chilling. At least 10 litres of ice is required to chill 20 litres of boiling wort to pitching temperature.

A package of Danstar Nottingham Ale yeast was rehydrated and tossed into a litre of wort pulled from the mash. I boiled and cooled the mini-wort and shook it like mad. Oh well, no harm done and Savannah Brown Ale is on her way. After 4 hours the yeast has gone into a frenzy, swirling and churning and bubbling like a city alive with people. Magic eh?

I'll keep you posted and take some photos of the action.I learned that the Heat index was 44C today. Man I could go for a beer right now.
Cheers!

Tuesday, April 17, 2007

My Blue DIY Primary

Blue PrimaryMeet Blue
This is Blue my primary/secondary fermenter. It only holds 20 litres, but I scale recipes for 18 or 19 litres. It has an airlock on the main lid, but can accomodate a blow-off hose from the small cap. I've never had a racked off beer need a blow-off hose, yet (is there really a first time for everything?)

Blue also has a fermometer attached to the side. For convenience, I marked a measure on the side, by adding a litre of water at a time and marking it off like a ruler from 2 to 22 litres.

Inside the jug is fairly easy to clean, but you need to use a soft bottle brush to get up in and 'round the handle. A piece of rag on chop stick will work too.

Blue is an example of Do it Yourself homebrew in the Philippines.

Before I go any further, I want to say a big THANK YOU to Andy from Canada who sent me a package of yeast in the mail. Not just any yeast, but Danstar's Nottingham Ale Yeast. He saw my crazy page called Help Dan Make Good Homebrew in the Philippines. Maybe you can help too. I know that you've got a package of yeast or some spare hops lying around the homebrew cabinet. I have plans for that yeast in a dark ale. I will start on the brew tomorrow and keep you posted.

My last malting is fully dried and ready to use. Although it rained here recently and the humidity has been high, the sun is scorching. So with all the malt ready to go, tomorrow is brew day. I've got the freezer packed with ice and have my yeast starter growler sanitizing.

An update on my little 10 litre batch of all grain that I made a while back is clearing and tasting good. I was concerned that the quality of the barley or the protein content would hinder the clarity or taste.

I am more excited than ever to get a full batch of ale under way. I'll keep you posted.

Cheers!

Sunday, April 15, 2007

My Mini Malt Mill

Blender with Mill AttachementMmmm Malt...
After my last experience with crushing my malt with a rolling pin (see this page), hammer and whatever else I could find, I finally splurged a whole P650 ($13.80 US) and bought a blender. A blender you ask! For milling? Yes a friend of mine in Canada suggested that members of his homebrew club have been using blenders for milling malt for years. He suggested "only in short bursts," as the idea is to keep the husks mostly intact and to avoid making flour.

Well I am not a big fan of product reviewing as it usually sounds biased, but I will review this blender for sake of homebrewers who may want a very cheap mill for busting up their malt.


The brand is Home Tech (actually like this: homEtech) , model HTB-1.5L and it has two speeds and pulse button. It's heavy duty glass is about 10mm thick and feels quite robust. It states a "50 ounce capacity", I guess that is fluid ounces.

Mill Attachment and Results

This blender has what the manufacturer calls a "grinder attachment" (see photo) and it is apparently suitable for "coffee beans". The instructions explain the usage of the "dry & wetmill attachment." Note that the blades on the mill attachment are stainless steel like the blender attachment, but not sharped.

Pretty good grind.
As a test and to get the technique right, I used the mill attachment to chew up about 1kg of malt. By pulsing the unit for short bursts was able to get a decent grind, not too fine and not too coarse. With a little practice and observation I was off and running.

All in all, I like the milling attachment. OK, it's kind of small and only holds about 100g at time, but it saves much labor and rolling pin action. If you are considering a cheap mill for your malt, I will suggest this model. The price is certainly right for me. Oh, and it comes with a 1 year warranty, so if you fry the motor making a barley wine, you're covered.

Now go have a beer and save the rolling pin for making pastry.

Best wishes.

Saturday, April 14, 2007

Zymurgy Arrives

Today was a big day in the province. No, I'm not superstitious and Saturday the 14th means nothing to me. Today, I received my copy of Zymurgy magazine from the USA! I also received a FINAL NOTICE from the post office here to come and collect my parcel from Homebrew Heaven. Gee, what happened to the first notice? LOL I think more than one person was sleeping on the job during Holy Week.

Oh well, at things do get here and I have slightly more faith in the postal system than before. The post office is closed today, but Monday I'll go down there and pick up my parcel.

Today, I also made a common temperature table for conversion of metric to imperial. I read of mash, fermentation and sterilization temperatures in ºF and my thermometer is ºC only. I thought I could print it out and stick it on the wall by the stove. Anyways, here it is:

Table of Common Brewing Temperatures

*A note about the last temperature on the table. There is a newly discovered organism that can survive standard 121 degree autoclaving. It lives in volcanic vents under the sea, so there isn't much of a chance that the average brewer will encounter strain 121.

The homemade malt is drying in the sun now and another full day will do it. I may even be kilning some this afternoon in the solar oven. The sun is hot today. A perfect day to have a water outage hey?

Happy Day!