 Un-Mega Brewing
 Not all of us have 8 hours to whip up a 5 gallon all-grain batch, even if it is Saturday. Everything takes longer, mashing, sparging and with big batches; longer to boil, longer to chill, longer to clean up. This is why I like to do a Mid-Week Nano Brew. OK, this is only a starter for you 10 gallon brewers out there, but I enjoy brewing.
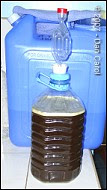
I often do a 4 litre (about a US gallon) extract batch in about 2 hours and that includes clean up. It's easy, fast and versatile and gives me choices when I ask my friends "what kind of beer do you want?" It also gives me plenty of opportunity to experiment with recipes, changing hop schedule, different yeast strains or trying an unusual ingredient or fruit like mango. I should also note that little batches are ideal for the homebrewer in the tropics who wants to brew a real lager, but cannot afford the dedicated fridge. A small fermemter can be worked into your existing fridge by moving things around. By the way, my 4 litre nano-fermenter is nothing fancy. It is actually a PET water bottle with a airlock fitted to the lid! I chuck a kitchen towel or t-shirt over it to keep the light out. Very convenient, see the photo below.
 Brew -2 hours
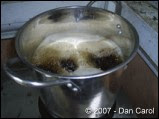
 Start with 4 litres of bottled water in a soup pot. Bring to a boil and stir in 500g of dry malt extract. It only takes a pinch (like 1/2 teaspoon) of higher alpha bittering hops and boil away. In 45 to 50 minutes add another pinch of some finishing hops and you're almost done.
By this time, if you've kept the lid off the pot, you'll have about 3.5 litres. In the last 15 minutes you can cover or leave the lid off to get about 3.5 litres total wort in your pot. In my nano-chilling regime I use a cold water bath and I add 500ml of santized ice, so 3.5 litres is perfect for my 4 litre nano-fermenter.
I prepare my sanitized ice bags, 500ml each, the day before. I buy "ice bags" at the supermarket and fill them with boiled/cooled water. Into the freezer overnight and they are hard in the morning. As long as you handle them correctly and don't let the bag touch your wort, you should be fine. Stir the ice in with the thermometer and watch the temperature drop .
While I am chilling in the bath, I am readying my starter in the 4 litre mini-fermenter. I rehydrate the yeast directly in the sanitized fermenter and add the cooled wort on top. Simple as pie. Shake the heck out of it to aerate. It's so nice and lightweight.
Because the batches are nice and small you can often brew another batch to go on top of the dregs from the last batch. If your sanitation is good, this is another good way to get some extra mileage from your hard-to-come-by yeast. It will be ripping in no time. Place your nano-brew in a cool, dark place for a few days and it will be beer.
Today I made a very basic dark ale from 500g of dark DME, some hops (Magnum and Cascades), some Cooper's yeast and of course some drinking water. It doesn't get more basic than this. Basic beer recipes usually work good.
In the time it took me to write up this blog, it looked like this.

I am happy to have any kind of dark beer here in the Philippines.
If I made it,
it tastes even better.
Today I made a very basic dark ale from 500g of dark DME, some hops (Magnum and Cascades), some Cooper's yeast and of course some drinking water. It doesn't get more basic than this. Basic beer recipes usually work good.
In the time it took me to write up this blog, it looked like this.
I am happy to have any kind of dark beer here in the Philippines.
If I made it,
it tastes even better.
UPDATE: 6:13 PM...
When she goes mad with krausen, attach a 3/8" (10mm) hose and let it blow into a cup or something. This Cooper's yeast is lovin' it! See photo.

Cheers!

1 comment:
This brew rocked. Unfortunately, I made way too little. 4 litres is never enough of dark ale to have on hand.
Love to make this again in 23 litre batch.
Cheers!
Post a Comment