My Cheapest Fermenter Chilling Box DesignI have a thing about not spending too much money on stuff that I can improvise from junk. Maybe I got that from my Dad, I don't know. I should have hung out with McGyver in the 1980's.
Before I continue, let me explain something about the Philippines and most other places in the tropics... It's hot. It's hot all the time. Even at night in the "winter" it's hot. Our little yeast buddies don't like it too hot, they go crazy and make our beer taste funny. So I give them a few degrees of a chill when they are working hard. It's the least I could do for them.
I have this simple and effective fermenter chilling box that I made from some junk. I call it the CFCE (Cheapest Fermenter Chiller Ever). I think I spent $1 for all the parts including tape...now that's cheap. No, that's McGyver!
The box idea comes from the Son of a Fermenter design that's quite poplular with homebrewers. I did some research and found that junky white polystyrene beadboard that comes in appliance packages and just about everything else these days, is actually a very good insulator at R4 per inch. See my previous post on the subject
here.
A Tale of Two BoxesThe basic parts are two carboard boxes, some beadboard and a few pieces of extra cardboard. Throw in a roll of packing tape to hold all the parts together and you are in business. Here's a drawing.

Firstly, there is a Box A, which is big enough to hold your fermenter, plus some extra room on top to place a few 2 litre bottles lying down. Ideally this Box A is not much bigger than your fermenter.
Then there is the bigger Box B. Box B should be about 100mm (4 inches) bigger that Box A on all sized. If Box B is too much bigger, then you will have to find lots of beadboard to fill the space. Mind you, your R value will be improved with an increase in space between the boxes.
How I did it
I'll explain how I did it and let you figure something out with your scraps.
I first reinforced the big box's (Box B) bottom and tape down about three or four layers of extra cardboard and tape the seams and seal it up good. Solid! Then I dump a bunch of broken beadboard pieces into the bottom of Box B, about 100mm thick.
Now I place Box A inside of Box B. See the diagram above; gee this is easy! Now it's just a matter of filling around Box A and getting beadboard all the way down to the bottom, along each side. It's a lot of crumpling and breaking the beadboard. Sometimes the pieces fit good already, so look for rounded corner pieces that match your filling requirements.
Here's what the insides look like before I taped the deck down.

There is one more piece that completes the base unit. It is a top deck to set the lid on. The deck is made of a single piece of cardboard with a rectangle (or square) hole in the middle and four tabs that are folded downwards where they meet Box B.
You have to be careful to measure it correctly to fit your two boxes. Unfortunately, I cannot tell you the exact dimensions of your deck as I don't know your box sizes. Here's a diagram to help you follow what the top deck is.

I used packing tape to seal the top deck on to the base unit. Tape may not be required if you are measuring twice and cutting once.
The lid is simply anything that fits into Box B so as to cover Box A. You can make a lid from stacked cardboard layers, polystyrene pieces, a single piece of cardboard with a blanket on top, whatever you have. As long as you can remove the lid to change your ice bottles and check your brew. The top lid is not that important as the cool air will sink to the bottom of the chiller. Just give your lid some insulating properties. I used 8 cardboard pieces stacked up with a rope handle from the 4th piece to the outside. Be creative.
Cooling Power TestBefore you brew, you should do a dry run as you probably have enough to worry about on brew day. I suggest that you freeze a bunch of water in plastic bottles the night before the dry run test. Freeze about 5 litres of water in 1 to 2 litre plastic bottles.
The next day, fill your fermenter with 20ºC water and get your thermometer(s) out. Put your fermenter in the chiller and place some ice bottles in plastic trays on top of your fermenter. (The trays collect the dripping condensed water.) The ice being on top is good to allow the cool air to sink downwards around the fermenter and collect at the base. If you remember brewing 101, lager yeasts will be down there at the bottom of the fermenter and enjoying that cooler climate.
If you have a fermometer watch the temperature of the water in the fermenter. If you don't have a fermometer, place a thermometer beside the fermenter.
By adding ice you should be able to cool the water to lager fermenting temperatures (10ºC). How much ice depends largely on the room temperature where the chiller is located. Compare the outside temperature to the inside temperature. This is called the temperature differential. With practice, you will learn the efficiency of your chiller. Oh, don't put the chiller in the sun or other super hot place, like fireplaces, furnaces, ovens or whatever. (My lawyer made me say that!)
After your dry run, you can prepare as much ice as you need to make through the fermentation at whatever temperature you need. I find 2 litres a day for ale yeasts at 30ºC ambient is good. Make more for lager yeasts and higher ambient temperatures.
I wish you all the best and happy "cool" brewing whether you are in the Philippines or anywhere else in the world.
Cheers!
 Brew in a Bag?
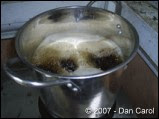 Un-Mega Brewing
  Brew -2 hours

 I am living on an island where sugar is cheap and sugar refining is big business, so it's not unusual to want to play with sugar in brewing. I'm not a big fan of the cider flavours of plain old cane sugar but I have enjoyed small additions of caramelized invert sugar.
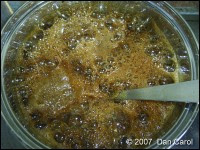 Put sugar and calamansi (or lemon or lime) juice in a pot. Add water just to cover. Stir and heat on low. Keep boiling it on low. Add a tablespoon of water occasionally as the syrup gets too thick. As the sucrose reacts with the water and acid (citric acid) it becomes fructose and glucose. As the heat is applied the sugars oxidize and burn slightly, called caramelization. Caramelization produces interesting flavors in beer as some of these flavours appear in the finished product. After the sugar is the desired colour or flavour turn up the heat a little to remove any excess water. Pour the thick syrup onto some baking paper and allow it to cool and solidify. Store in plastic bags in the fridge and have it ready for brew day.
 Crazy for Coco-Krausen?

 Malted Milk


 Sunrise Observations
 Thank You!


 Meet Blue
 Mmmm Malt...


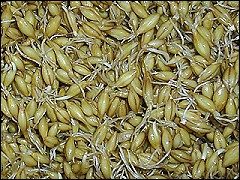 For anyone who is interested, I published a condensed guide on Bodensatz (The Beer Site) about malting at home. If you like, you can
  Today was a 'down to it' trip to the city. Pay bills, grocery shopping, haircut, whatever. It's of course Summer Holidays here now and there is a zillion people at the mall. I thought I knew what a zillion was but... oh never mind. I'll get used to crowds.
 Brew Day at Last!


 Diastatic Power