Hi all,
I thought I would take a few minutes to update everyone on the past experiments I have done.
Ovaltine Brew:
This was interesting. After about a month in the fermenter I bottled it with a teaspoon of sugar in each bottle. After another 2 weeks I tried it. Here are my notes:
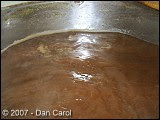
Pour is thick, head and carbonation is very good and not unlike commercial dark ales. Smell is slightly malty, light hop aroma and some other undefined smell. It is clear and looks like coke or pepsi. Mouthfeel is kind of thick feeling. Taste is malt in the middle and then some strange (not overly bad) taste. Finish is strong on this flavor. I can't really describe it. I think it is from milk solids? Not cheesy or sour. Strangely there is no hint of cocoa or chocolate taste whatsoever.
I was expecting more of a malty chocolate taste with this brew, but it didn't work out. It's all gone now, so it must have been okay. I will do some research into what the milk and vegetable oil does when aged.
Mead (Pineapple Melomel)
My mead is still resting in bottles at my old neighbors house. I did taste some before bottling and it was wicked strong stuff. Like a vodka and pinepple drink with a shot of white wine. The hops settled out well. Unfortunately we moved and I could not justify taking the bottles of mead with me. My neighbor will put them to use around Christmas time.
My dark ale from extract was excellent! All gone, sorry. I will have to find some malt extract to go with my remaining hops.
Cheers!
Friday, July 20, 2007
Sunday, July 8, 2007
Look North...Way North!
Relocating is never easy and certainly a different buzz in the Philippines. Now here we are in Luzon and the past months have brought many changes including getting married.
The move to Luzon has come a cost in some brewing equipment and I am now going to start hunting around Metro Manila for vessels and what-nots. It is now equipment and supplies hunting mode, Luzon style. Of course I am going to be looking for brewing supplies too and I'll let everyone know what I find.
Cheers!
Monday, April 30, 2007
Mashing in a Bag? Yup, Crazy Aussies
 Brew in a Bag?
While surfing the homebrew forums I came across this great idea that is being refined in Australia and is sweeping the homebrewing world. It is called Brew in a Bag or BIAB. It's a very simple technique for mashing in the kettle with a bag made of fine-weave polyester. The water is added to the kettle, then the bag, then the milled grains go into the bag. When mash temperature is correct, the whole thing is covered up for 90 minutes. If temperature adjustments are needed, just a burst of flame to get the temp up again is required.
After mashing, you simply (with some physical effort mind you) lift the bag o'grains out and let them drain into the kettle. No sparge required. I did read an article from a guy in Florida that sparged as well with high efficiency. Once the wort is sitting pretty in the kettle, fire up the gas and boil as normal, adding hops etc. Chill, aerate and pitch the yeast.
There is some issues raised with the fact that the mash is so thin (like 30 plus litres of water) and the pH of the mash. The mash is usually much thicker (less water for the grain) . This has been addressed by the authors of a very well put together document on AussieHomebrewer.com. For pictures and play-by-play see this site.
The biggest benefit of BIAB is the cost. A picnic cooler can set you back a few bucks and if everything is working with your extract brews why bother playing with all-grain?
Today, I am going to see if I can find some polyester fabric so I can give this system a try. I will also try an experiment with a polypropylene woven seed bag. That is about the right size for my smaller stock pot.
Gee, I also need to start malting again, so it's off to the barley shop. Wish me luck!
Happy brewing!
Friday, April 27, 2007
Mid-Week Nano Brews
 Un-Mega Brewing
 Not all of us have 8 hours to whip up a 5 gallon all-grain batch, even if it is Saturday. Everything takes longer, mashing, sparging and with big batches; longer to boil, longer to chill, longer to clean up. This is why I like to do a Mid-Week Nano Brew. OK, this is only a starter for you 10 gallon brewers out there, but I enjoy brewing.
I often do a 4 litre (about a US gallon) extract batch in about 2 hours and that includes clean up. It's easy, fast and versatile and gives me choices when I ask my friends "what kind of beer do you want?" It also gives me plenty of opportunity to experiment with recipes, changing hop schedule, different yeast strains or trying an unusual ingredient or fruit like mango. I should also note that little batches are ideal for the homebrewer in the tropics who wants to brew a real lager, but cannot afford the dedicated fridge. A small fermemter can be worked into your existing fridge by moving things around. By the way, my 4 litre nano-fermenter is nothing fancy. It is actually a PET water bottle with a airlock fitted to the lid! I chuck a kitchen towel or t-shirt over it to keep the light out. Very convenient, see the photo below.
 Brew -2 hours
 Start with 4 litres of bottled water in a soup pot. Bring to a boil and stir in 500g of dry malt extract. It only takes a pinch (like 1/2 teaspoon) of higher alpha bittering hops and boil away. In 45 to 50 minutes add another pinch of some finishing hops and you're almost done.
By this time, if you've kept the lid off the pot, you'll have about 3.5 litres. In the last 15 minutes you can cover or leave the lid off to get about 3.5 litres total wort in your pot. In my nano-chilling regime I use a cold water bath and I add 500ml of santized ice, so 3.5 litres is perfect for my 4 litre nano-fermenter.
I prepare my sanitized ice bags, 500ml each, the day before. I buy "ice bags" at the supermarket and fill them with boiled/cooled water. Into the freezer overnight and they are hard in the morning. As long as you handle them correctly and don't let the bag touch your wort, you should be fine. Stir the ice in with the thermometer and watch the temperature drop .
While I am chilling in the bath, I am readying my starter in the 4 litre mini-fermenter. I rehydrate the yeast directly in the sanitized fermenter and add the cooled wort on top. Simple as pie. Shake the heck out of it to aerate. It's so nice and lightweight.
Because the batches are nice and small you can often brew another batch to go on top of the dregs from the last batch. If your sanitation is good, this is another good way to get some extra mileage from your hard-to-come-by yeast. It will be ripping in no time. Place your nano-brew in a cool, dark place for a few days and it will be beer.
Today I made a very basic dark ale from 500g of dark DME, some hops (Magnum and Cascades), some Cooper's yeast and of course some drinking water. It doesn't get more basic than this. Basic beer recipes usually work good.
In the time it took me to write up this blog, it looked like this.

I am happy to have any kind of dark beer here in the Philippines.
If I made it,
it tastes even better.
Today I made a very basic dark ale from 500g of dark DME, some hops (Magnum and Cascades), some Cooper's yeast and of course some drinking water. It doesn't get more basic than this. Basic beer recipes usually work good.
In the time it took me to write up this blog, it looked like this.
I am happy to have any kind of dark beer here in the Philippines.
If I made it,
it tastes even better.
UPDATE: 6:13 PM...
When she goes mad with krausen, attach a 3/8" (10mm) hose and let it blow into a cup or something. This Cooper's yeast is lovin' it! See photo.

Cheers!
Wednesday, April 25, 2007
Making Invert and Belgian Candi Sugar
 I am living on an island where sugar is cheap and sugar refining is big business, so it's not unusual to want to play with sugar in brewing. I'm not a big fan of the cider flavours of plain old cane sugar but I have enjoyed small additions of caramelized invert sugar.
Inverting the sugar means converting cane sugar's sucrose into fructose and glucose by using an acid like citric acid. The sugar is boiled for 30 minutes on low heat in a little bit of water. Caramelizing is the oxidization of sugars and creates more interesting and complex flavours. In the Belgian style beers, candi sugar is used to increase alcohol content, impart a variety of colours and flavours and create a lovely dense mousse-like head.
In darker beers I like to use a small amount, say 500g of dark brown sugar (muscovado) or light brown sugar (demarama). I will usually mix these half and half with white sugar and caramelize to create a nice complex sweetness. My recipe for my half and half sugars is like this:
250g white sugar
250g demarama sugar
2 tbs calamansi juice (or 1 tsp citric acid)
water to cover
 Put sugar and calamansi (or lemon or lime) juice in a pot. Add water just to cover. Stir and heat on low. Keep boiling it on low. Add a tablespoon of water occasionally as the syrup gets too thick. As the sucrose reacts with the water and acid (citric acid) it becomes fructose and glucose. As the heat is applied the sugars oxidize and burn slightly, called caramelization. Caramelization produces interesting flavors in beer as some of these flavours appear in the finished product. After the sugar is the desired colour or flavour turn up the heat a little to remove any excess water. Pour the thick syrup onto some baking paper and allow it to cool and solidify. Store in plastic bags in the fridge and have it ready for brew day.
If you are using basic white sugar it will take about 20 to 30 minutes of low heat to produce an amber coloured candi sugar. In 45 minutes the syrup will begin to appear orange. It can take over 1 hour to produce dark red candi sugar, so be patient and watch the pot all the time. If you have a thermometer, try to maintain 120ºC (ºF) . An oven style, dial face, meat probe works good. If you have a candy thermometer, even better.
Increasing gravity
As a rule, 1 pound of sugar in 1 gallon of water is 1.046 (46 gravity points). In metric this is about 120 grams per litre. Adding a kilogram of inverted sugar to a standard batch of beer adds about 15 points. Depending on the Terminal Gravity (TG), this increase in gravity can increase alcohol content by over 2%. The Belgian ales, dubbels and triples are high-strength beers often above 7% and some exceeding 10% alc./vol.
Sweet eh?
Feel free to experiment with candi sugar or a homemade facsimile in your brewing. Start on the light side though, too much sugar can give your beer an alcohol boost, but it can also make your beer taste like wine.
Cheers,
Coco-Krausen: Brewing with Ovaltine
 Crazy for Coco-Krausen?
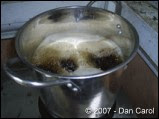
As part of my Ovaltine experiment, I brewed a bigger 12 litre batch yesterday. I also boiled up some invert sugar to go with it. Here are the details of the Brewing a Beer with Ovaltine Experiment. The recipe became more complex as I fiddled with it. Maybe I should have kept is simple stupid, but I love the complexities.
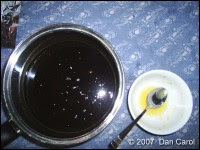
I started with 1.2kg of Ovaltine in 10 litres of water. This has a specific gravity of about 1.050 in the kettle, if my calculations (guesses) are correct. This gravity is ok for hop utilization. I boiled it hard for 15 minutes and scooped the fat and protein that separated and floated in the foam. I take it that whey powder and milk solids were the grey blobs that were floating up on the side of the pot.
 I added 14g of Nugget hop pellets at 15 minutes. I then let it roll hard for another 30 minutes before adding 14g of Cascades as finishing hops. With about five minutes left in the hour-long boil I added 500g of inverted, caramelized brown sugar which I made while watching the boil.
These are the added ingredients that I did not plan on until the last minute. I also added 2 teaspoons of instant coffee and 1 teaspoon of cinnamon. Apparently, cinnamon in an antioxident and hey, I like Ovaltine in my coffee, so it can't be all that bad. I finished the boil and chilled in a bucket of ice water. I added the thick wort the fermenter and added fresh water to 12 litres. I shock it like mad and picthed a package of Munton's Gold ale yeast that I had rehydrated earlier.
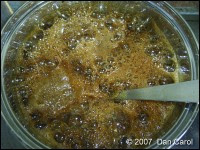
 For being a fairly high-gravity brew (1.080?), it was roaring in a few hours! The zillions of happy yeasts were chowing on the chocolate wort making some kind of coco-krausen. See photo. It's been a day and a bit and the experiment seems to be going ok. The smell from the fermenter is of malt, chocolate, hops and fruit. I am guessing that the fruity aroma is coming from some kind of reaction with the cocoa? Or perhaps the inverted, caramelized brown sugar? Anyways, it sure smells good.
When the fermentation is complete, I will rack into a secondary with some gelatin in it. I hope to be able to clear the beer, but have not researched much in the way of finings yet. This is a comepletely different kettle of coco compared to real beer brewing.
Happy brewing!
Monday, April 23, 2007
Wacky Ovaltine Beer Experiment
 Malted Milk
Most of you will know what Ovaltine is. It's a malted milk drink powder that you mix with water or milk. In the UK Ovaltine is popular, in other parts of the world, Nestle's Milo is popular. After doing some research, reading packages, nutrition web sites, ingredients, etc., I've come up with an experiment to use Ovaltine as a base for beer. If you hadn't guessed it already, malt extract is a big part of these malted milk drink mixes. I will brew up a small batch and experiment with a recipe that I have formulated to make what is essentially 4 litres of some kind of strange chocolate ale.
Here's what I am thinking...
Boil up 500g of Ovaltine in 5 litres of water. I don't know if the yeast will have enough nutrients from Ovaltine alone, so I'll chuck in a teaspoon of dry bakers' yeast in the boil. Add a pinch of bittering hops, boil some more and add some finishing hops, cool, aerate and pitch an ale yeast on it. After a week, I'll rack it onto some gelatin and see how she clears. It will very likely taste like beer as Ovaltine's principal ingredients are sugar, malt extract and glucose.
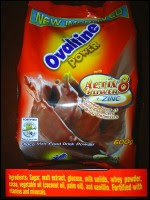
Here are the ingredients from the label of the Philippines version of Ovaltine:

The ingredients that are bad for beer have little Xs near them, the ingredients that are not bad for beer have little check marks. Sounds pretty neat eh? I'll be take lots of notes and preparing a detailed blog entry to keep everyone aware of what's happening in the laboratory. LOL
Sleep now, it's been a long day.
Sunday, April 22, 2007
Yeast Washing 101 - With Photos!
Yesterday I washed some yeast from the trub of my latest batch. The yeast is Nottingham Ale yeast and it's certainly strong and clean enough to go another round. For your enjoyment, I did a yeast wash and took notes and a few photos so you can see the process. I posted this on Bodensatz as well. Here it is.
I hope that you have found this useful.
Cheers!
Yeast Washing
Sometimes I re-use yeast from one batch to go another round. This can be accomplished easily by simply brewing up a batch and pouring it into the fermenter on top of the trub from the last batch. This is not always practical as brewing is often a day-long event and we may only have time to rack or bottle on any given day. Washing yeast allows you to preserve it a clean environment for use at a later date.
After you have siphoned the bulk of your beer from the fermenter, you are left with some trub in the bottom. Trub is that lovely sludge of protein, yeast, hops and everything else that has settled out of your beer. It's the yeast that we want and not much of everything else that's gunked to the bottom of your fermenter. We want to isolate the yeast so we can store it. This process is known as Post Fermentation Yeast Washing.
Here's how I do it.
Start by making sure that you have the gear below (or reasonable facsimiles).
Gear:
Sanitized or sterilized bottle with lid. Plastic ok.
Smaller bottle, preferably glass with metal screw cap.
Sanitized funnel
Isopropyl alcohol
Cotton ball(s)

Fig 1. Gear for Yeast Washing
Before you siphon:
Sanitize a bottle, cap and funnel. I use a plastic bottle of about 1 to 2 litres. I put it into a bleach solution along with the racking cane, hose etc. that I'll be using in the siphoning process. If you have a glass jar, boil it in water for 10 minutes to sanitize it. Leave it in the pot with water. Cover the pot and let it cool to room temperature.
Cover the fermenter when you have finished siphoning. This will reduce the chance of airborne infection; an eyelash or fly landing in the trub.
- Setup a clean workspace. Wipe down the surface with your sanitizing solution.
- Put the sanitized funnel into the sanitized bottle.
- Slosh the trub around and disturb the sediment to make it easy to pour.
- Using alcohol on a cotton ball, wipe the rim of the fermenter where the trub will pass when pouring.
- Carefully pour the sludge into the funnel/bottle. Leave a inch or more of airspace at the top of the bottle.
- Cap the bottle and place upright in the fridge.
The next day, you will see a separation similar to Fig 2.

Fig 2.Gravity Makes Layers
The yeast will be floating on top of the heavier sediments, but still suspended in the beer part. Rotate the bottle and you'll see the yeast swirling around at the bottom of the beer layer. See Fig 3.

Fig 3. Yeast in the Beer
After Settling
- Boil and cover about 500ml of water.
- Sanitize another bottle. This one can be a little smaller. I use about 300ml size bottle.
(I use a glass bottle with metal cap and boil them with the water.) - Place a normal drinking glass on your workspace, next to your sanitized bottle.
- Carefully pour off the beer layer into the drinking glass.
- As the beer layer gets down to near the sediment, gently swirl and switch to pouring into the sanitized bottle.
- Add some of the boiled/cooled water to the bottle and cap.
- Record on the cap; date, yeast strain and generation. E.g. April 21, 2007, Saflager, Gen 1.
- Place bottle upright in the fridge. If you can place the bottle way in the back of the fridge where it's very cool.

Fig 4. Ready
Notes:
- Do not pour out too much of the sediment. We want a small amount of liquid with the yeast, but not too much heavy stuff.
- The boiled water must be below 40ºC (105ºF) or you risk killing the yeast.
- Boiled water contains little oxygen and extends the yeasts' life in the bottle.
- The idea of adding water is to dilute the alcohol exposure to the yeast.
The solution will separate into layers once again. You can wash again if you like, but I wouldn't bother. It's important to note that the more you handle the yeast and expose it to the outside world, the higher the risk of infection. I prefer to leave it as is until my next brew day.
How long will it keep?
If your sanitation practices are good you can store yeast in this manner for a month or more. I have kept washed yeast in the fridge, near freezing, for a month and a half and found nothing wrong with it. Some claim several months, but ultimately you will have to be the judge. Open the bottle and give it a sniff and let your nose decide. If it smells fresh and yeasty, then it's likely good to use. If is smells pungent, rotten, vinegary, sour or shows signs of other lifeforms, molds etc., toss it out.
Note that sometimes lager yeast strains give off a tiny amount of sulfur dioxide and may smell sulfury or like rotten eggs when you first open the bottle. This is acceptable and this should dissipate.
Yeast will slowly turn darker brown with age. People describe old yeast as peanut butter color. If it looks like peanut butter, toss it.
Always remember: It is not worth risking a good batch of beer and good ingredients on some bad yeast. Yeast is not expensive in the big picture.
How many times?
People often ask how many times they can wash and re-use the same yeast. The short answer is a maximum of five or six generations. Like everything else, there is a long answer too. Yeast are living, mutating organisms. Along with the yeast there will always be bacteria and other wild yeasts that co-exist in the trub. As time passes, the risk of making a bad batch of beer increases as other organisms compete with the yeast for resources. The actual number of generations will depend largely on your sanitation practices.
Before you brew
Take your bottle from the fridge and let is come back to room temperature. Give the bottle a gentle swirl to spin the yeast up off the trub and decant the liquid portion into your starter wort.
I hope that you have found this useful.
Cheers!
Friday, April 20, 2007
The Gods Must Be Crazy
Bottles, Kegs or Other?
The past week has been one of a large quest for a bottle, or keg or any real packaging system for my homebrew. I was looking at glass bottles, PET bottles, PartyPig, Cornelius kegs and everything seemed overdone, overpriced or out of reach.
My first choice is a lever or bench bottle capper with a steady supply of crown caps. Unfortunately, these are difficult items to source.
A 20 litre Corny won't fit in my fridge (if I still want to have cold food).
How much for a PartyPig?
The closest place I could find tinted PET beer type bottle were HB shops in Aussie. The price of the bottles plus shipping is silly. I could by the bottles full of beer for cheaper! Oh stink I says.
Then...
Remember the movie The Gods Must Be Crazy?
 Sunrise Observations
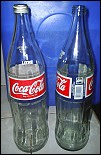
In my morning wanders around the village, I noticed that there are still 1 litre glass Coke & Sprite bottles with screw caps floating around. These heavy glass bottles are circa 1980's in North America before the PET revolution, but they are still widely used here. My fiancee says that there are 750ml glass bottles in circulation, but we don't know if they are screw top.
There is a deposit system on the glass bottles so they are currently returned almost 100%. The deposit is small and I could afford a few of these at that price.
The Sprite bottles are green and the Coke are clear, same as everywhere else. I talked to the vendor and he says they are property of Coca Cola. Nuff said. LOL Something to work on eh?
So there is always an answer if you look hard enough and yes, the Gods must be crazy.
Cheers!
P.S. Venus is in conjunction with the crescent moon. How many drams in a pennyweight?
The past week has been one of a large quest for a bottle, or keg or any real packaging system for my homebrew. I was looking at glass bottles, PET bottles, PartyPig, Cornelius kegs and everything seemed overdone, overpriced or out of reach.
My first choice is a lever or bench bottle capper with a steady supply of crown caps. Unfortunately, these are difficult items to source.
A 20 litre Corny won't fit in my fridge (if I still want to have cold food).
How much for a PartyPig?
The closest place I could find tinted PET beer type bottle were HB shops in Aussie. The price of the bottles plus shipping is silly. I could by the bottles full of beer for cheaper! Oh stink I says.
Then...
Remember the movie The Gods Must Be Crazy?
Sunrise ObservationsIn my morning wanders around the village, I noticed that there are still 1 litre glass Coke & Sprite bottles with screw caps floating around. These heavy glass bottles are circa 1980's in North America before the PET revolution, but they are still widely used here. My fiancee says that there are 750ml glass bottles in circulation, but we don't know if they are screw top.
There is a deposit system on the glass bottles so they are currently returned almost 100%. The deposit is small and I could afford a few of these at that price.
The Sprite bottles are green and the Coke are clear, same as everywhere else. I talked to the vendor and he says they are property of Coca Cola. Nuff said. LOL Something to work on eh?
So there is always an answer if you look hard enough and yes, the Gods must be crazy.
Cheers!
P.S. Venus is in conjunction with the crescent moon. How many drams in a pennyweight?
I Love It When The Mail Comes
 Thank You!
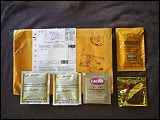
I have to say I am fortunate to have people send me stuff in the mail. The other day I received another envelope from Canada with some packages of yeast. It was from Mark in Kitchener Ontario Canada. Mark was kind enough to send Cooper's ale yeast, Nottingham, two packs of Munton's Gold ale yeast and some very nice Lalvin K1-V1116 wine yeast. Thanks a million Mark. I'll get something in the mail for you soon.
Savannah Brown or IPA?
The other day I created a recipe on the fly for what I thought was going to be in the style of an American Brown Ale. After running my ingredients through BeerTools' Recipe Calculator, I am guessing that the hop schedule is going to produce more of an IPA. So I will relabel the latest brew to: Savannah IPA. Gee, I can smell the hops from here!
Mango Tango
My neighbour wants me to go to Guimaras to talk to some people at a mango plantation about making mango wine. I don't know much about winemaking other than the basics. I've been searching out some recipes (mostly from Australia) for sweet, medium and dry mango wine. Most call for pectinase and yeast nutrient of which I have none. I may be able to source some here if I can find the right contact. Perhaps the plantation people know. I'd be more inclined to use the 3rd rate mangoes for a beer flavouring. We'll have to have a look there.
Bottling Chores
I am also looking at using PET bottles for beer. I know that there are oxygen migration issues with conventional PET bottles, but after how long is it noticeable? I cannot imagine having any homebrew around for more than six months. LOL There are also these rugged sports drink bottles that are thick and have a sturdy cap. Some are dark tinted, deep blue, black, violet, green etc. and come in handy 500ml to 1.5 litre sizes.
If I intend to keep a few brews more than 3 months, I will put it in glass. While I am in the city I will also look for a bottle capper and some crown seals as there are many decent 500ml amber glass bottles here for free to cheap. Wish me luck finding a capper or caps. Everyone I talk to seems to know what they are, but have no idea where to get them.
Wow, how about an 8 litre keg in the fridge? That's about my laziness.
'Till next time. Cheers!
Wednesday, April 18, 2007
Brewday Fun and Mayhem
 Savannah Brown Ale
Today was a fun day at the DIY brewery. Man it takes a full day when brewing all-grain, but it's good fun. All my real work was done in the early hours, so I got a jump on brewing by milling 4kg of malt. (actually the wife did the hard part) I boiled up 10 litres of rinse water to use later in the day. I formulated a recipe for a brown ale based on brewer's malt, brown toasted and black malts and some dry malt extract.
By 10:30AM I was off and mashing. I mashed a single step infusion mash with a grist ratio of 3.4 litres of water for each per kilogram of malt. I think this works out to the standard 1.5 quarts per pound that my American friends use. Close anyways. I did a 20 minute protein rest at 50ºC as I know this malt has a little much protein. I started mashing at 11AM and held in at 66ºC for 80 minutes. Sweet!
 While mashing, I made a make-shift lauter tun from my old friends the blue water jugs. I used a piece of food-grade 10mm tubing in a coil with slices in it as the manifold. I attached it right to the existing water tap on the jug. It fits perfectly. OK, you have to improvise here eh? See photo of the inside of the jug/lauter tun.
 I really don't know if the plastic will make the final beer taste like plastic, but I couldn't detect any problems in the samplings of wort that I took before and during the boil. I do know that it works just like the real thing and after recirculating for a minute the bed was set.
For the sparge I used 10 litres at 75ºC and did a batch sparge. I can't be bothered with trickle and wait. I got almost 25 litres out in total and of course I had to use the two biggest pots I had on to hold it all. I like using two pots as I can make a side brew like I did today. In the smaller pot I added some different ingredients and changed the hop schedule.
 The boil was 70 minutes all up with 60 of Nugget 12.8% AA, and 15 minutes of Cascade 7.5% AA. In the side batch I added 1/2 cup of brown sugar and in the main batch I added 500g of dark dry malt extract. This should give a more complex "brown" malty taste (I am hoping).
 The big chill came with lots of bottles of ice. In fact I didn't have enough ice made to power the chiller tonight, so it's the royal treatment with air conditioning for these guys until they get into their own chiller tomorrow. By the way, on a hot day, the water here is 32ºC and really is not that great for chilling. At least 10 litres of ice is required to chill 20 litres of boiling wort to pitching temperature.
A package of Danstar Nottingham Ale yeast was rehydrated and tossed into a litre of wort pulled from the mash. I boiled and cooled the mini-wort and shook it like mad. Oh well, no harm done and Savannah Brown Ale is on her way. After 4 hours the yeast has gone into a frenzy, swirling and churning and bubbling like a city alive with people. Magic eh?
I'll keep you posted and take some photos of the action.I learned that the Heat index was 44C today. Man I could go for a beer right now.
Cheers!
Tuesday, April 17, 2007
My Blue DIY Primary
 Meet Blue
This is Blue my primary/secondary fermenter. It only holds 20 litres, but I scale recipes for 18 or 19 litres. It has an airlock on the main lid, but can accomodate a blow-off hose from the small cap. I've never had a racked off beer need a blow-off hose, yet (is there really a first time for everything?)
Blue also has a fermometer attached to the side. For convenience, I marked a measure on the side, by adding a litre of water at a time and marking it off like a ruler from 2 to 22 litres.
Inside the jug is fairly easy to clean, but you need to use a soft bottle brush to get up in and 'round the handle. A piece of rag on chop stick will work too.
Blue is an example of Do it Yourself homebrew in the Philippines.
Before I go any further, I want to say a big THANK YOU to Andy from Canada who sent me a package of yeast in the mail. Not just any yeast, but Danstar's Nottingham Ale Yeast. He saw my crazy page called Help Dan Make Good Homebrew in the Philippines. Maybe you can help too. I know that you've got a package of yeast or some spare hops lying around the homebrew cabinet. I have plans for that yeast in a dark ale. I will start on the brew tomorrow and keep you posted.
My last malting is fully dried and ready to use. Although it rained here recently and the humidity has been high, the sun is scorching. So with all the malt ready to go, tomorrow is brew day. I've got the freezer packed with ice and have my yeast starter growler sanitizing.
An update on my little 10 litre batch of all grain that I made a while back is clearing and tasting good. I was concerned that the quality of the barley or the protein content would hinder the clarity or taste.
I am more excited than ever to get a full batch of ale under way. I'll keep you posted.
Cheers!
Sunday, April 15, 2007
My Mini Malt Mill
 Mmmm Malt...
After my last experience with crushing my malt with a rolling pin (see this page), hammer and whatever else I could find, I finally splurged a whole P650 ($13.80 US) and bought a blender. A blender you ask! For milling? Yes a friend of mine in Canada suggested that members of his homebrew club have been using blenders for milling malt for years. He suggested "only in short bursts," as the idea is to keep the husks mostly intact and to avoid making flour.
Well I am not a big fan of product reviewing as it usually sounds biased, but I will review this blender for sake of homebrewers who may want a very cheap mill for busting up their malt.
The brand is Home Tech (actually like this: homEtech) , model HTB-1.5L and it has two speeds and pulse button. It's heavy duty glass is about 10mm thick and feels quite robust. It states a "50 ounce capacity", I guess that is fluid ounces.

This blender has what the manufacturer calls a "grinder attachment" (see photo) and it is apparently suitable for "coffee beans". The instructions explain the usage of the "dry & wetmill attachment." Note that the blades on the mill attachment are stainless steel like the blender attachment, but not sharped.
 Pretty good grind.
As a test and to get the technique right, I used the mill attachment to chew up about 1kg of malt. By pulsing the unit for short bursts was able to get a decent grind, not too fine and not too coarse. With a little practice and observation I was off and running.
All in all, I like the milling attachment. OK, it's kind of small and only holds about 100g at time, but it saves much labor and rolling pin action. If you are considering a cheap mill for your malt, I will suggest this model. The price is certainly right for me. Oh, and it comes with a 1 year warranty, so if you fry the motor making a barley wine, you're covered.
Now go have a beer and save the rolling pin for making pastry.
Best wishes.
Saturday, April 14, 2007
Zymurgy Arrives
Today was a big day in the province. No, I'm not superstitious and Saturday the 14th means nothing to me. Today, I received my copy of Zymurgy magazine from the USA! I also received a FINAL NOTICE from the post office here to come and collect my parcel from Homebrew Heaven. Gee, what happened to the first notice? LOL I think more than one person was sleeping on the job during Holy Week.
Oh well, at things do get here and I have slightly more faith in the postal system than before. The post office is closed today, but Monday I'll go down there and pick up my parcel.
Today, I also made a common temperature table for conversion of metric to imperial. I read of mash, fermentation and sterilization temperatures in ºF and my thermometer is ºC only. I thought I could print it out and stick it on the wall by the stove. Anyways, here it is:

*A note about the last temperature on the table. There is a newly discovered organism that can survive standard 121 degree autoclaving. It lives in volcanic vents under the sea, so there isn't much of a chance that the average brewer will encounter strain 121.
The homemade malt is drying in the sun now and another full day will do it. I may even be kilning some this afternoon in the solar oven. The sun is hot today. A perfect day to have a water outage hey?
Happy Day!
Oh well, at things do get here and I have slightly more faith in the postal system than before. The post office is closed today, but Monday I'll go down there and pick up my parcel.
Today, I also made a common temperature table for conversion of metric to imperial. I read of mash, fermentation and sterilization temperatures in ºF and my thermometer is ºC only. I thought I could print it out and stick it on the wall by the stove. Anyways, here it is:
*A note about the last temperature on the table. There is a newly discovered organism that can survive standard 121 degree autoclaving. It lives in volcanic vents under the sea, so there isn't much of a chance that the average brewer will encounter strain 121.
The homemade malt is drying in the sun now and another full day will do it. I may even be kilning some this afternoon in the solar oven. The sun is hot today. A perfect day to have a water outage hey?
Happy Day!
Friday, April 13, 2007
The Cheapest Fermenter Chiller Ever
My Cheapest Fermenter Chilling Box Design
I have a thing about not spending too much money on stuff that I can improvise from junk. Maybe I got that from my Dad, I don't know. I should have hung out with McGyver in the 1980's.
Before I continue, let me explain something about the Philippines and most other places in the tropics... It's hot. It's hot all the time. Even at night in the "winter" it's hot. Our little yeast buddies don't like it too hot, they go crazy and make our beer taste funny. So I give them a few degrees of a chill when they are working hard. It's the least I could do for them.
I have this simple and effective fermenter chilling box that I made from some junk. I call it the CFCE (Cheapest Fermenter Chiller Ever). I think I spent $1 for all the parts including tape...now that's cheap. No, that's McGyver!
The box idea comes from the Son of a Fermenter design that's quite poplular with homebrewers. I did some research and found that junky white polystyrene beadboard that comes in appliance packages and just about everything else these days, is actually a very good insulator at R4 per inch. See my previous post on the subject here.
A Tale of Two Boxes
The basic parts are two carboard boxes, some beadboard and a few pieces of extra cardboard. Throw in a roll of packing tape to hold all the parts together and you are in business. Here's a drawing.

Firstly, there is a Box A, which is big enough to hold your fermenter, plus some extra room on top to place a few 2 litre bottles lying down. Ideally this Box A is not much bigger than your fermenter.
Then there is the bigger Box B. Box B should be about 100mm (4 inches) bigger that Box A on all sized. If Box B is too much bigger, then you will have to find lots of beadboard to fill the space. Mind you, your R value will be improved with an increase in space between the boxes.
How I did it
I'll explain how I did it and let you figure something out with your scraps.
I first reinforced the big box's (Box B) bottom and tape down about three or four layers of extra cardboard and tape the seams and seal it up good. Solid! Then I dump a bunch of broken beadboard pieces into the bottom of Box B, about 100mm thick.
Now I place Box A inside of Box B. See the diagram above; gee this is easy! Now it's just a matter of filling around Box A and getting beadboard all the way down to the bottom, along each side. It's a lot of crumpling and breaking the beadboard. Sometimes the pieces fit good already, so look for rounded corner pieces that match your filling requirements.
Here's what the insides look like before I taped the deck down.

There is one more piece that completes the base unit. It is a top deck to set the lid on. The deck is made of a single piece of cardboard with a rectangle (or square) hole in the middle and four tabs that are folded downwards where they meet Box B.
You have to be careful to measure it correctly to fit your two boxes. Unfortunately, I cannot tell you the exact dimensions of your deck as I don't know your box sizes. Here's a diagram to help you follow what the top deck is.

I used packing tape to seal the top deck on to the base unit. Tape may not be required if you are measuring twice and cutting once.
The lid is simply anything that fits into Box B so as to cover Box A. You can make a lid from stacked cardboard layers, polystyrene pieces, a single piece of cardboard with a blanket on top, whatever you have. As long as you can remove the lid to change your ice bottles and check your brew. The top lid is not that important as the cool air will sink to the bottom of the chiller. Just give your lid some insulating properties. I used 8 cardboard pieces stacked up with a rope handle from the 4th piece to the outside. Be creative.
Cooling Power Test
Before you brew, you should do a dry run as you probably have enough to worry about on brew day. I suggest that you freeze a bunch of water in plastic bottles the night before the dry run test. Freeze about 5 litres of water in 1 to 2 litre plastic bottles.
The next day, fill your fermenter with 20ºC water and get your thermometer(s) out. Put your fermenter in the chiller and place some ice bottles in plastic trays on top of your fermenter. (The trays collect the dripping condensed water.) The ice being on top is good to allow the cool air to sink downwards around the fermenter and collect at the base. If you remember brewing 101, lager yeasts will be down there at the bottom of the fermenter and enjoying that cooler climate.
If you have a fermometer watch the temperature of the water in the fermenter. If you don't have a fermometer, place a thermometer beside the fermenter.
By adding ice you should be able to cool the water to lager fermenting temperatures (10ºC). How much ice depends largely on the room temperature where the chiller is located. Compare the outside temperature to the inside temperature. This is called the temperature differential. With practice, you will learn the efficiency of your chiller. Oh, don't put the chiller in the sun or other super hot place, like fireplaces, furnaces, ovens or whatever. (My lawyer made me say that!)
After your dry run, you can prepare as much ice as you need to make through the fermentation at whatever temperature you need. I find 2 litres a day for ale yeasts at 30ºC ambient is good. Make more for lager yeasts and higher ambient temperatures.
I wish you all the best and happy "cool" brewing whether you are in the Philippines or anywhere else in the world.
Cheers!
I have a thing about not spending too much money on stuff that I can improvise from junk. Maybe I got that from my Dad, I don't know. I should have hung out with McGyver in the 1980's.
Before I continue, let me explain something about the Philippines and most other places in the tropics... It's hot. It's hot all the time. Even at night in the "winter" it's hot. Our little yeast buddies don't like it too hot, they go crazy and make our beer taste funny. So I give them a few degrees of a chill when they are working hard. It's the least I could do for them.
I have this simple and effective fermenter chilling box that I made from some junk. I call it the CFCE (Cheapest Fermenter Chiller Ever). I think I spent $1 for all the parts including tape...now that's cheap. No, that's McGyver!
The box idea comes from the Son of a Fermenter design that's quite poplular with homebrewers. I did some research and found that junky white polystyrene beadboard that comes in appliance packages and just about everything else these days, is actually a very good insulator at R4 per inch. See my previous post on the subject here.
A Tale of Two Boxes
The basic parts are two carboard boxes, some beadboard and a few pieces of extra cardboard. Throw in a roll of packing tape to hold all the parts together and you are in business. Here's a drawing.
Firstly, there is a Box A, which is big enough to hold your fermenter, plus some extra room on top to place a few 2 litre bottles lying down. Ideally this Box A is not much bigger than your fermenter.
Then there is the bigger Box B. Box B should be about 100mm (4 inches) bigger that Box A on all sized. If Box B is too much bigger, then you will have to find lots of beadboard to fill the space. Mind you, your R value will be improved with an increase in space between the boxes.
How I did it
I'll explain how I did it and let you figure something out with your scraps.
I first reinforced the big box's (Box B) bottom and tape down about three or four layers of extra cardboard and tape the seams and seal it up good. Solid! Then I dump a bunch of broken beadboard pieces into the bottom of Box B, about 100mm thick.
Now I place Box A inside of Box B. See the diagram above; gee this is easy! Now it's just a matter of filling around Box A and getting beadboard all the way down to the bottom, along each side. It's a lot of crumpling and breaking the beadboard. Sometimes the pieces fit good already, so look for rounded corner pieces that match your filling requirements.
Here's what the insides look like before I taped the deck down.
There is one more piece that completes the base unit. It is a top deck to set the lid on. The deck is made of a single piece of cardboard with a rectangle (or square) hole in the middle and four tabs that are folded downwards where they meet Box B.
You have to be careful to measure it correctly to fit your two boxes. Unfortunately, I cannot tell you the exact dimensions of your deck as I don't know your box sizes. Here's a diagram to help you follow what the top deck is.
I used packing tape to seal the top deck on to the base unit. Tape may not be required if you are measuring twice and cutting once.
The lid is simply anything that fits into Box B so as to cover Box A. You can make a lid from stacked cardboard layers, polystyrene pieces, a single piece of cardboard with a blanket on top, whatever you have. As long as you can remove the lid to change your ice bottles and check your brew. The top lid is not that important as the cool air will sink to the bottom of the chiller. Just give your lid some insulating properties. I used 8 cardboard pieces stacked up with a rope handle from the 4th piece to the outside. Be creative.
Cooling Power Test
Before you brew, you should do a dry run as you probably have enough to worry about on brew day. I suggest that you freeze a bunch of water in plastic bottles the night before the dry run test. Freeze about 5 litres of water in 1 to 2 litre plastic bottles.
The next day, fill your fermenter with 20ºC water and get your thermometer(s) out. Put your fermenter in the chiller and place some ice bottles in plastic trays on top of your fermenter. (The trays collect the dripping condensed water.) The ice being on top is good to allow the cool air to sink downwards around the fermenter and collect at the base. If you remember brewing 101, lager yeasts will be down there at the bottom of the fermenter and enjoying that cooler climate.
If you have a fermometer watch the temperature of the water in the fermenter. If you don't have a fermometer, place a thermometer beside the fermenter.
By adding ice you should be able to cool the water to lager fermenting temperatures (10ºC). How much ice depends largely on the room temperature where the chiller is located. Compare the outside temperature to the inside temperature. This is called the temperature differential. With practice, you will learn the efficiency of your chiller. Oh, don't put the chiller in the sun or other super hot place, like fireplaces, furnaces, ovens or whatever. (My lawyer made me say that!)
After your dry run, you can prepare as much ice as you need to make through the fermentation at whatever temperature you need. I find 2 litres a day for ale yeasts at 30ºC ambient is good. Make more for lager yeasts and higher ambient temperatures.
I wish you all the best and happy "cool" brewing whether you are in the Philippines or anywhere else in the world.
Cheers!
Thursday, April 12, 2007
Malting at Home Guide
 For anyone who is interested, I published a condensed guide on Bodensatz (The Beer Site) about malting at home. If you like, you can click here to to have a look at the guide. There are lots of pictures and step-by-step instructions. I hope that some of you homebrewers find it useful, whether you are in the Philippines or not.
The malting is going well and the barley is fully modified and in the sun drying as I write. The system is getting more efficient as I learn. See the photo at left. That is fully modified.
I've been thinking lately and because I am always in the mood to experiment, I have come up with two possible experiments.
Experiment #1:
I had a Cali Shandy the other day and very much enjoyed it. I would like to try to brew something along the lines of a pineapple accented beer. If anyone has any recipes please let me know. My guess would be to add some fresh pineapple to the wort, but I am not sure how the citric acid would effect the wort pH. Probably it wouldn't lower it enough to be of a concern. Yeast like a lower pH environment of between 5.2 and 5.6.
Experiment #2:
We eat a lot of ampalaya and grow it in the garden here. I tasted some ampalaya leaf the other day and noticed a similarity with fresh hops; super bitter that is. I want to add some ampalaya leaves to the boil on my next batch. Maybe I'll split the boil into two and try some with ampalaya and some without.
We'll see how my 10 litre batch goes. It's clearing now. We may be able to bottle soon.
Maltster... over.
Tuesday, April 10, 2007
Wild Easter Week is Over - Back To Life
 Today was a 'down to it' trip to the city. Pay bills, grocery shopping, haircut, whatever. It's of course Summer Holidays here now and there is a zillion people at the mall. I thought I knew what a zillion was but... oh never mind. I'll get used to crowds.
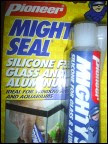
While on the daunting city jaunts, I quite often managed to acquire some small but useful things for my home brewery; today was good for useful things. I have located some aquarium silicone for making water-tight connections in the brew gear. It's clear and requires 7 days curing and a rinse before I can use it in brewing. It's called Pioneer Mighty Seal and comes in the small 50g tubes.
I also found some tiny little pump spray bottles at Watson's for isopropyl alcohol. When I am working with yeast cultures I can just spray and wipe with a cotton ball.
I also picked up the closest thing I could find to a turkey baster... it's called a "flavor injector" which is basically a large veterenarian type hypodermic needle that I can suck a wort sample with. The nice thing is that is has a detatchable stainless steel tip and it's easy to clean. I could also attach a length of small-diameter tubing where the needle part is.
Another thing-a-ma-jiggy is a make-shift airlock. From a sprayer bottle kit I use the tubing with some food grade silicone and some cable ties to make an airlock for my growler. I have another airlock on order from the US, but who knows when that will get here. The postal system here is about as reliable as a 10 cent watch.
There is another batch of malt in the works. This time 5kg of barley. It's already germinating very well and will be fully modified in about two days. I'll take some pictures.
Cheers!
Sunday, April 8, 2007
One Step Closer to 100% Homemade Beer
 Brew Day at Last!
I thought I would keep you guys posted on my malting at home experiment.
Today, I did a 10 litre mini-batch with the generic malt I made. All manually crushed with a rolling pin (lots of work) like I mentioned before. For 3 kilos it took me over an hour!
I mashed with a 3.4:1 water to grain with 3kg of malt. I did a long 60 minute protein rest at 45ºC to 50ºC because I don't know the protein content of the malt. If it is heavy in protein I hope this will help. If it's lighter on protein the beer will likely be headless. Going for sweet and fermentable, I went by taste on the beta amylase rest. It rested long and low as I held in for 90 minutes at 60ºC. I want to see how sweet this stuff can get.
I suspect that the malt could have been modified more or I did something to disable some of the enzymes during kilning. More things to try next time.
I boiled the sweet smelling wort for an 75 minutes. 15 minutes for scunge skimming and 60 minutes with hops in. I got a good hot break. I hopped it with 1/2 oz of Magnum pellets and 1/2 oz of Cascades at 45 minutes. When I chilled in the ice bath I could see more globs forming. Aerated and pitched with 1 package of re-hydrated Cooper's ale yeast. Total yield was just over 10 litres.
I have no idea what kind of beer this is going to be. I hoped to make something quite bitter and dry. Hopefully the yeast has the punch to take the FG down low. Staying away from the alpha amylase rest was the idea there. The color is very light and I suspect it will be quite a pale ale, probably more like a lager in looks.
All good fun. Considering that the unknown in my recipe is the malt, and making malt can be just as much an art as making beer. I'll let you know how it turns out. I expect to hear the airlock to be calling me soon.
This is truly 'seat of the pants' homebrewing in the Philippines.
Cheers!
Saturday, April 7, 2007
Basic Brewing and Boracay
Basic Brewing Radio
Wow, we got back from the beautiful island of Boracay after a few days R&R and I found that James from Basic Brewing has mentioned me in his podcast! Hey thanks James. Here are some of the links to the malting topic pages.
Wow, we got back from the beautiful island of Boracay after a few days R&R and I found that James from Basic Brewing has mentioned me in his podcast! Hey thanks James. Here are some of the links to the malting topic pages.
- Malting Barley at Home, Finally
- Modification of Barley
- More on Modification
- Houston, We have Malt
- Making Crystal Malt at Home
- Roasters and Rhizomes
Sometime this week I am going to brew a small batch from the malt that I have made and check the quality. I am a little concerned about the protein levels. I read somewhere on the net that feed barley is higher in protein that malting barley. They also described the feed kernels as plump and round. The barley that I have malted is certainly not plump.
Boracay
Boracay (pronounced bore-ra--k-eye) is a very small island just off the northern tip of Panay, here in the Philippines. We are fortunate to live fairly close and can take a bus and short ferry trip to get there. If there is one place in the Philippines where tourists flock to it's Boracay. The beaches on Boracay are beautiful, white sand, palm trees; basically the stuff of postcards and the sunsets are world famous. There are many resorts, shops, restaurants and night clubs. I guess if you have ever been to Hawaii you know the feeling.

The big attractions are the beaches and the scuba diving. The reefs and colorful sealife around Boracay are well known in the diving scene. If you are brave you can try parasailing; the less brave can wander the markets and malls, but I am happy to have a beer on the beach while sitting under a palm tree.

Beer in Boracay is San Miguel brands all the way, but I did see some Heineken, Colt 45, Carlsberg and Lone Star in a grocery store there. I can forgive the locals for overcharging for beer as they are making a living off the tourism business. On White Beach a bottle of San Mig Light can fetch 60 pesos. The bottlecap has clearly stamped on it 18 pesos. To give you an idea the supermarket price is $0.38 US and the beach price is $1.27 US. Of course there is ususally some kind of entertainment or happy hour specials, 2 for 1 etc. and most tourists don't care as long as it's cold.

All in all, Boracay is wonderful place to visit. It's safe, has all the services, lots of things to do and tons of entertainment. We're going to go back again, for sure, but now we need a few days to recover from our vacation!
Cheers!
Tuesday, April 3, 2007
What are Base Malts?
Base Malts
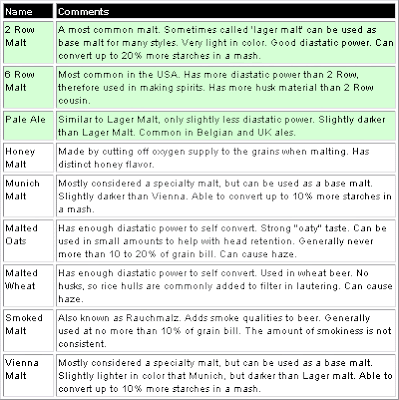
Last time we were talking about diastatic power of a malt. Base Malts are malts that have enough diastatic power to convert their own starches to sugars. Common base malts are 2 Row, 6 Row and Pale Ale. These malts can be used to convert other starches in the mash. The table below may help you get your base malts sorted.
Last time we were talking about diastatic power of a malt. Base Malts are malts that have enough diastatic power to convert their own starches to sugars. Common base malts are 2 Row, 6 Row and Pale Ale. These malts can be used to convert other starches in the mash. The table below may help you get your base malts sorted.
In all fairness malted rice and sorghum could be added to the list. Both have their share of problems when it comes to mashing and the resulting taste of the beer brewed. Maybe my friend Greg will find the magic bullet and make a really great tasting beer from rice.
Base malts are really the work-horse malts that carry the bulk of the enzymes to convert starches to sugars. With a large proportion of base malt, we can then add specialty malts and adjuncts to the mash to create different effects.
In the Philippines it's expensive to ship lots of base malt from Australia or the US. The cost of shipping often is greater than the malt. I'd recommend malting your own base malt here and ordering in smaller amounts of specialty malts to create the flavors and textures you want. Adjuncts such as oats, rice and corn are readily available in supermarkets, so we don't have to import them.
Next I want to look at adjuncts and their effects in the mash and the finished beer.
Cheers!
Monday, April 2, 2007
Down By The Old Malt Mill
Gee, I wish I had a barley mill. I want to experiment with the malt I've made and want to check out how it looks, feels and behaves compared to commercially available malts I've used before.
 Diastatic Power
One thing of most interest is the diastatic power of the malt. A well modified base malt will have at least 20% more muscle so that things that cannot self convert their own starch can be included in the mash. The base malt has the extra amylase to convert other things such as corn, rice, unmalted barley and oatmeal. The amylase enzymes float around in the mash at 60 to 70ºC chomping all that starch into sugars.
Extract brewers need not worry as all the sugars are already available. So with extract recipe no enzymes are needed. Enzymes are denatured (killed) in the evaporation and or drying processes.
Anyways, back to the mill. The idea of a barley mill is to crush the grain and not shred its husk. We are going to need the husk intact to act as a filter in the lauter tun (aka cooler). We also don't want the seed to be pulverized into powder as the flour can cause gummy blobs that block the flow from the lauter tun and cause 'stuck mashes'. So the job the mill has to do is like a rolling pin with enough force to crumble the insides of the seed and yet leave the husk in pretty good shape.
Git Yer Rollin' Pin
Seeing as though I have no real barley mill, but I do have a rolling pin I thought I'd give that a go. By placing a few cups of malt in a heavy duty plastic bag I began rolling and crushing. I did this in the kitchen on the big cutting board.
The result was pretty good and looked consistent with what I was hoping for in a crush. Now a few cups is a few cups, but I have lots of cups to crush.
It's a lot of work, it's hot and I am getting thirsty. I guess I am going to have to make some beer soon.
Cheers!
Diastatic PowerOne thing of most interest is the diastatic power of the malt. A well modified base malt will have at least 20% more muscle so that things that cannot self convert their own starch can be included in the mash. The base malt has the extra amylase to convert other things such as corn, rice, unmalted barley and oatmeal. The amylase enzymes float around in the mash at 60 to 70ºC chomping all that starch into sugars.
Extract brewers need not worry as all the sugars are already available. So with extract recipe no enzymes are needed. Enzymes are denatured (killed) in the evaporation and or drying processes.
Anyways, back to the mill. The idea of a barley mill is to crush the grain and not shred its husk. We are going to need the husk intact to act as a filter in the lauter tun (aka cooler). We also don't want the seed to be pulverized into powder as the flour can cause gummy blobs that block the flow from the lauter tun and cause 'stuck mashes'. So the job the mill has to do is like a rolling pin with enough force to crumble the insides of the seed and yet leave the husk in pretty good shape.
Git Yer Rollin' Pin
Seeing as though I have no real barley mill, but I do have a rolling pin I thought I'd give that a go. By placing a few cups of malt in a heavy duty plastic bag I began rolling and crushing. I did this in the kitchen on the big cutting board.
The result was pretty good and looked consistent with what I was hoping for in a crush. Now a few cups is a few cups, but I have lots of cups to crush.
It's a lot of work, it's hot and I am getting thirsty. I guess I am going to have to make some beer soon.
Cheers!
Saturday, March 31, 2007
Roasters and Rhizomes
Hi all,
 Yesterday evening I roasted some malt in a can on the gas stove. We are fortunate enough to have a "dirty kitchen" outside at the back of the house. The smoke was terrific. At least it was dark and no one could see the clouds billowing. The malt has a strong coffee flavor. It took quite a while to roast as I kept squirting water in the can. I understand that the malt can ingnite at these kinds of temperature, so I kept the water coming and played it safe.
My friends at Bodensatz were truly impressed with my malting effort. In a country where malt is rarely seen it non-liquid forms, I think I did good.
Today I was entertaining the idea of growing hops here in the Philippines. I Googled a bunch of queries and came up with some wonderful news. I would appear that YES! we can grow hops here. My friends at Oz Craftbrewer have been growing hops in northern Australia at 19 degrees south of the equator for years. I read another article about a guy in India that is successfully growing two American varieties Cascade and Nugget. How on earth to get the rhizomes here in good shape for planting is another issue. More research is required but at least it can be done. I understand the that the hop flowers are smaller, but more frequent flowering cycles in the tropics. Sweet hey? If you are interested here is the link: http://hbd.org/hbd/archive/3975.html#3975-1
Got to go to the city today. I may stop and buy some more barley on the way home.
Cheers!
Yesterday evening I roasted some malt in a can on the gas stove. We are fortunate enough to have a "dirty kitchen" outside at the back of the house. The smoke was terrific. At least it was dark and no one could see the clouds billowing. The malt has a strong coffee flavor. It took quite a while to roast as I kept squirting water in the can. I understand that the malt can ingnite at these kinds of temperature, so I kept the water coming and played it safe.My friends at Bodensatz were truly impressed with my malting effort. In a country where malt is rarely seen it non-liquid forms, I think I did good.
Today I was entertaining the idea of growing hops here in the Philippines. I Googled a bunch of queries and came up with some wonderful news. I would appear that YES! we can grow hops here. My friends at Oz Craftbrewer have been growing hops in northern Australia at 19 degrees south of the equator for years. I read another article about a guy in India that is successfully growing two American varieties Cascade and Nugget. How on earth to get the rhizomes here in good shape for planting is another issue. More research is required but at least it can be done. I understand the that the hop flowers are smaller, but more frequent flowering cycles in the tropics. Sweet hey? If you are interested here is the link: http://hbd.org/hbd/archive/3975.html#3975-1
Got to go to the city today. I may stop and buy some more barley on the way home.
Cheers!
Friday, March 30, 2007
Making Crystal Malt at Home
OK, What the heck is Crystal Malt?
Crystal malt is 'green' or undried malt that has been stewed in water at just the right temperature and time to get the amalyse enzymes to activate and convert some of the malt's starches into sugar. This stewing or mashing is exactly what happens in the mash tun when we are making a wort on brew day. By holding the temperature steady between 65 and 70ºC the enzymes come alive and start to work on the starch. After about 40 minutes, the malt is removed from the water (wort?) and dried to crystalize the sugars. After drying, the malt may be roasted to impart a variety of colors and flavors.
I was fortunate enough to stumble across Beeston Malting Company's description of Crystal Malt and gleaned the following procedure:
 Homestyle Crystal Malt
This is my homemade procedure with notes.
Crystal malt is 'green' or undried malt that has been stewed in water at just the right temperature and time to get the amalyse enzymes to activate and convert some of the malt's starches into sugar. This stewing or mashing is exactly what happens in the mash tun when we are making a wort on brew day. By holding the temperature steady between 65 and 70ºC the enzymes come alive and start to work on the starch. After about 40 minutes, the malt is removed from the water (wort?) and dried to crystalize the sugars. After drying, the malt may be roasted to impart a variety of colors and flavors.
I was fortunate enough to stumble across Beeston Malting Company's description of Crystal Malt and gleaned the following procedure:
- Air dry @50ºC for 5 minutes
- Stew between 65 and 75ºC for 40 minutes
- Air dry @80ºC for 40 minutes
- Cure in oven @135ºC for 2 hours
- Optionally, roast as desired
Homestyle Crystal MaltThis is my homemade procedure with notes.
A quick air drying is pretty simple; just get it in the sun for 5 minutes. For the mini-mash I put the green malt in a pyrex mixing bowl and placed it in a pot of water. The water acts as a temperature regulator and has thermal inertia; so the temperature doesn't fluctuate so much.
I then brought the mini-mash temperature up to 70ºC and maintained it by adding boiling water from the kettle as the mash cooled. After 40 minutes I decanted the liquid and put the malt back in the sun to dry. The liquid tasted pretty starchy at this point, but has a slightly sweet taste when it cooled a bit.
I hope to have a roaster made for tomorrow.
Cheers and happy malting.
Dan
P.S. Today is HOT! 35ºC and strong breezes. It feels like a blast furnace in your face when you walk outside. Ahhh perfect for drying malt. :-)
Thursday, March 29, 2007
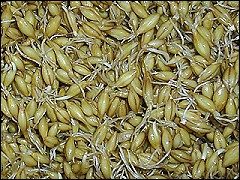
Houston, We have Malt
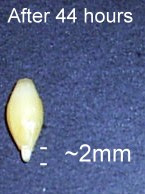
Sorry for the lateness of my updates. I wanted to show you the malting process in more detail and I have some photos from the camera loaded. After a day or two of soaking, your barley will look like the left photo. This may happen sooner, even after 1 day depending on the age and general viability of the seed. After a day or two of germnination, your barley will look like the photo on the middle.

Stop the seeping/air rests when you get little bud roots (called chits) protruding from the kernel. Start germinating: spread them out and turn them every few hours. Keep them moist with a spray bottle of water w/a few drops of bleach.
When they look like photo 2 or the roots are slightly longer, start drying. Dry in the sun at up to 50ºC. Direct sunlight around noon is going to be warm enough.
After the rootlets have shriveled and fall off, crank up the heat. I used my solar oven to get temperatures around 80ºC to 90ºC. A few hours in the oven and your are the proud owner of your own malt.
Try to dark roast some small amounts of the malt. Experiment with roasting, wetting, stewing at 50ºC, charring whatever turns your crank. Just make sure to use about 70% or more of the pale malt in your mash as it has the enzymes in tact. These enzymes will break down the starches into fermentable sugars (mainly maltose). Diastatic power is a grain's ability to break down starches.
Gotta go, work to do.
Cheers!
Tuesday, March 27, 2007
The Day the Group was Launched
In previous posts I mumbled about forming a group, a club or association of homebrewers in the Philippines. Yeah right Dan. Are you some kind of politician? OK, not a politician as I think people still like me. Well on Saturday PM I posted some ads in a few of the Philippines related groups on Yahoo promoting the Homebrewers in the Philippines group.
The results were fantastic! Within a few hours there were 20 members! The next day there were 40 and today we sit at 49 members. We had special endorsement from Don at Living In The Philippines and that is really cool. Thanks Don. Don's group is very popular. (The link is: here)
If you are interested in joining in the discussion on beer, homebrew, wine making, mead making, vinegar, yogurt, cheese, sauerkraut and anything else that ferments then click the link and join.
Join na po!
I have too much work to do today, but I want to say I have bought more grains. I bought 2kg of barley and 2kg of wheat. We'll have to wait for my first experiment to finish. I think it may have gone sour so I want to start trying some new things again.
Job Openings
Oh yeah, we have a few openings in the group for persons of high expertise. We need a yeast expert (I think that is some sort of microbiologist), a malting specialist (maltster), a chemist, a brewmeister, physicist and a professional jester or clown. Know anyone that wants to have fun? Free stay at my place if you join. I provide the beer. Cool? Another oh... there is no monetary, financial or otherwise reward. This is a volunteer "job".
Just in case my lawyer complains, I will say that all disbursements to volunteers shall be in liquid form, ad nauseum, ad perpetum, ad barlyuem and some lupulum.
:-)
Cheers!
Saturday, March 24, 2007
More on Modification
 G'day mates!
Today is Hot and Slow
Yestday was a slow day and a hot one. I rinsed and stirred barley on and off for the whole day. I did manage to get some work done on the computer, but barley was the thing on my mind. I listened to Oz Craft Brewer Radio's 2 podcasts on malting at home and picked up a few tips. I like listening while I work. Programming is fun, but beer is funner.
The grain is starting to spout in heavier numbers now. I keep them under a fan in two big tubs. The depth of the barley is about 4 inches (100mm) and it's kept moist with a squirt bottle with water and a little bleach. So far nothing overly exciting to report, just more sprouting. It's in the 30's here in the daytime, so I am wondering what the higher temperatures do to the germination process. I popped the thermometer into the grain yesterday and measured a lovely 31ºC. I know that the grain itself is generating heat too.
When I get this germination phase over with, I am going to stew some and try to make a crystal malt. As far as I can tell, a crystal malt is taken from the germination bed 'green' and stewed at 50ºC for an hour to cause the amylase to kick into action. The amylase converts the starch in the endosperm into maltose. This is why crystal malt is so sweet and sugary. Once stewed, the crystal malt is dried. Because we're not overly worried about preserving the enzymes or its diastatic power, we can crank up the heat and make a variety of coloured crystal malts.
For leisure last night I studied all the different kinds of malt. There are dozens of varieties and even more variation from malthouse to malthouse. I don't have a giant rotating drum roaster, but I can improvise.
Our friend is coming back from Cebu today and we're going to pick her up at the airport soon.
Stay tuned!
Thursday, March 22, 2007
Modification of Barley

I've been soaking the barley seeds and straining for an air rest, then soaking again to induce the seeds to germinate. This morning after about 40 hours of steeping, I noticed some little roots coming out of the barley. Success!
It's now time to start the germination phase and keep the grain moving and moist until it's ready to dry. I've been listening to the many podcasts on producing malted barley products and I am excited to try the drying and roasting of the barley.
I have no idea of how this going to work out, but I am going to keep everyone posted as to how it does.
Cheers!
Wednesday, March 21, 2007
Malting Barley at Home, Finally
 Barley Ahoy!
Yesterday was a big day here in the sticks. I found a place that sells barley! It struck me when I was looking for info on the net and found the wikipedia entry for barley. Most of the barley in the world is grown for animal feed. Wow, what a concept. I went to the feed place a few km down the road and sure enough, two-row BARLEY! There was also wheat (trigo), oats and much more.
The funny part was when the guy there asked me "How many cocks do you have, Sir?" I said, "Uh...what?" He thought I was going to use the barley to feed my fighting cocks. I explained that barley was the main ingredient in cerbeza. Ah, he understands now. After all, you can't have a cock fight without beer.
So I ended up with 6kg in bag. I expect this 6 kilos to yield about 5 kilos when malted. Five kilos of malted barley is worth about $15 plus shipping. The raw barley is about 10 cents a pound or about $1.30 all up.
I started the soaking last night and the barley is swollen to almost twice the size already. I am soaking for 8 hours and then air resting for 1 to 2 hours. Soaking will be done tomorrow and then we'll start the germination phase.
Also, if anyone is looking for a 0ºC to 100ºC thermometer, labratory grade, they have them at Mercury Drugs for P170.
Gotta work na.
Monday, March 19, 2007
Simple Yeast Washing
Urban Brew Gear and Whatevers
Yesterday, in the city I picked up a nice stainless steel strainer, a Pyrex 2 cup measuring cup, a small funnel and some isopropyl alcohol for cleaning lips and rims when propagating yeast. I also looked at Ace for some basic plumbing items for the home brewery. Don't get me wrong I love hardware stores, but today we're off to Chinatown!
I have been doing lots of reading and listening to podcasts on yeast and how yeast live. Yeast is such a magical ingredient in making beer and I now know so much more about our simple celled friends. I am happy that so much fabulous information is available in the net. Paper, books and libraries worked for 1000 years, but the Interent is becoming so multi-media.
 Washing Yeast
I learned originally from Oz Craft Brewer how to wash yeast. Washing yeast involves collecting the trub (pronounced troob) from the bottom of your fermenter. After the initial fermentation is complete there is a whole bunch of sediment in your brew vessel.
If you sanitize two 1 litre canning jars (or similar) and carefully scoop the sediment from your fermenter into the jars. Don't let your dirty fingers or even fingerprints touch the liquid. Cover the jar with a small square of cling wrap and refrigerate.
In the next day or two it will magically separate. There will be a layer of beer, then a small layer of yeast, then a layer of heavier sediment. See the diagram.
I have read about acid washing yeast which involves lowering the pH to kill bacteria. The pH is lowered to about 2.5 and then the yeast is washed off. Yeast likes a lower pH environment, but a pH less than 2 will kill the yeast. Adding a drop of acid at a time and checking with the pH meter is required. Acid washing is something I could not be bothered with; maybe if my precious strain was to be infected.
I've done some trub collecting/yeast recycling before with Saflager's S23 dried lager yeast and I enjoyed more than five sucessful batches from the same 11.5g package of yeast. Ok, yeast is cheap to buy, but it takes about 2 weeks to get here from the US via airmail and I can brew two batches in 10 days di ba? Having said that; I have enjoyed Munton's, Cooper's and a host of other ale yeasts but never thought to preserve them. Shame.
(As a side note I have some champagne... (18% Alc./Vol. tolerant yeasts and some white and red wine yeasts brought in too.) I have a nice libraray, but its a job looking after them.
Liquid yeast packs from the US are risky. Long shipping times (10 plus days air frieght) and high temperatures of the topics make not for a 'yeast friendly' combination. Some homebrew shops will suggest shipping liquid yeast with an ice pack. Ice packs are okay, but only for a day or two maximum. If a homebrew shop in the US says "Yes! We ship to the Philippines", please don't expect anything living to make it to the Philippines in its life-full state.
Yeast Library
What we should be doing is getting a nice library of yeasts and sharing them with associates in the Philippines. I'll give you mine if you give me yours sort of thing. In the future, I will deveolp a very clean system and make some strains available here.
Stop!
Coffee time.
Yesterday, in the city I picked up a nice stainless steel strainer, a Pyrex 2 cup measuring cup, a small funnel and some isopropyl alcohol for cleaning lips and rims when propagating yeast. I also looked at Ace for some basic plumbing items for the home brewery. Don't get me wrong I love hardware stores, but today we're off to Chinatown!
I have been doing lots of reading and listening to podcasts on yeast and how yeast live. Yeast is such a magical ingredient in making beer and I now know so much more about our simple celled friends. I am happy that so much fabulous information is available in the net. Paper, books and libraries worked for 1000 years, but the Interent is becoming so multi-media.
Washing YeastI learned originally from Oz Craft Brewer how to wash yeast. Washing yeast involves collecting the trub (pronounced troob) from the bottom of your fermenter. After the initial fermentation is complete there is a whole bunch of sediment in your brew vessel.
If you sanitize two 1 litre canning jars (or similar) and carefully scoop the sediment from your fermenter into the jars. Don't let your dirty fingers or even fingerprints touch the liquid. Cover the jar with a small square of cling wrap and refrigerate.
In the next day or two it will magically separate. There will be a layer of beer, then a small layer of yeast, then a layer of heavier sediment. See the diagram.
I have read about acid washing yeast which involves lowering the pH to kill bacteria. The pH is lowered to about 2.5 and then the yeast is washed off. Yeast likes a lower pH environment, but a pH less than 2 will kill the yeast. Adding a drop of acid at a time and checking with the pH meter is required. Acid washing is something I could not be bothered with; maybe if my precious strain was to be infected.
I've done some trub collecting/yeast recycling before with Saflager's S23 dried lager yeast and I enjoyed more than five sucessful batches from the same 11.5g package of yeast. Ok, yeast is cheap to buy, but it takes about 2 weeks to get here from the US via airmail and I can brew two batches in 10 days di ba? Having said that; I have enjoyed Munton's, Cooper's and a host of other ale yeasts but never thought to preserve them. Shame.
(As a side note I have some champagne... (18% Alc./Vol. tolerant yeasts and some white and red wine yeasts brought in too.) I have a nice libraray, but its a job looking after them.
Liquid yeast packs from the US are risky. Long shipping times (10 plus days air frieght) and high temperatures of the topics make not for a 'yeast friendly' combination. Some homebrew shops will suggest shipping liquid yeast with an ice pack. Ice packs are okay, but only for a day or two maximum. If a homebrew shop in the US says "Yes! We ship to the Philippines", please don't expect anything living to make it to the Philippines in its life-full state.
Yeast Library
What we should be doing is getting a nice library of yeasts and sharing them with associates in the Philippines. I'll give you mine if you give me yours sort of thing. In the future, I will deveolp a very clean system and make some strains available here.
Stop!
Coffee time.
Working The Web on Sunday
Yesterday, I did lots of linking and link echange requests with some success. I made this little graphic to stick on the blogs...

Unfortunately, when I upload with Blogger they make the preview suck, but the image itself is clear.
Yeast Podcast
I did some listening to podcasts yesterday too and dropped an email to James at Basic Brewing Radio and asked him to plug the Homebrewing in the Philippines group. The podcast I enjoyed the most was James' three part interview with Wyeast's David Logston from November 2005. It's very informative and is well worth the over two hours of time they spend talking about all things to do with yeast; aeration, flocculation, attenuation, stuck fermentations and much more.
There is also a great two part interview with Gerard Lemmens all about hops. I didn't know that China is the third largest grower of hops in the world. Maybe someday those fresh hops can come south to us. I also want to research the possiblilities of growing any variety of hops here in the Philippines. I don't know much about the rhizomes and their ideal environment. I know the climate and country around Washington and Oregon states in the US having been there many times as I was born within a mile of the Columbia River. Yakima and Mt. Hood are words I remember since I could walk.
Today is Monday and it's grocery day again. I want to stop at the grain dealer and see what they have for raw grains. I know they have palay (unpolished rice), but maybe, just maybe they have some wheat or barley. That would rock. I have some Dry Malt Extract (DME) coming from the US right now and if I can malt some grain I can make a full bodied ale. I also have a variety of hops so depending on what I can come up with for malt, I may be able to make a beer with a "real" style. :-)
I tasted the ginger ale yesterday and gee it kicks. It's very dry now and has a noticable twang from the calamansi.
Got to go now. Busy day. I'll keep you posted.
Sunday, March 18, 2007
Philippines Sized Batches
 Blue Fermenters
Being a bit of a tightwad, I use those blue plastic water containers for brewing. These are everywhere in the Philippines as most of us use bottled water for cooking and drinking. I have two round or cylinder ones and two of the rectangular types. For the primary fermentation I always use a cylinder type as it's way easier to clean. Trying to clean the krauzen ring from a rectangular jug is not easy and not recommended.
The problem with being a tightwad is that it comes back to get me later. My brewing vessels are only 5 US gallons and most recipes call for 6 gallons. (6 US gallons is 5 Imperial gallons.) In metric terms, the blue water containers here are only about 20 litres and the standard recipes make 23 litres. So I make some adjustments to the recipes.
The difference between the two gallons is 83%.
Example...
5US gallons = 19 litres (5x3.8l)
5 Imperial gallons = 22.7 litres (5x4.54l)
19/22.7 = 0.837 or 83.7%
I round this down to 80% for simplicity and to increase the available headspace. This means that instead of producing 22.7 litres of beer, I make 18 litres a batch.
18 litres is a perfect sized batch for the blue water containers so abundant here. These smaller batches have a few benefits. For all-grainers this means small gear is needed to mash and boil. Smaller batches also means less ingredients and less bottling on bottling day. It also means (booo!) running out of beer sooner, but there is always more in the system.
Dave in Manila?
I heard on a podcast on Basic Brewing Radio archive from September 7, 2006 that Dave in Manila was having carbonation consistency problems. Wow! There is another homebrewer in the Philippines! I posted a message to James asking him to invite any homebrewers in the Philippines to get in touch with me. I hope to hear from you Dave.
Happy brewing!
Saturday, March 17, 2007
Malting at Home
Last night I had some time to listen to a podcast from the crazy guys at Australian Craft Brewers. The show was about malting at home and the processes involved. I will encapsulate for anyone that is interested. Note the same techniques can be used for malting rice.
Steep and Air Rests
Steep - soak grains in water for 8 hours
Drain - drain and allow air around the grains for about 1 hour.
Steep - add water again and soak for overnight, say 8 hours.
Drain - repeat the drain and air rest.
Repeat this process for 2 days or about 48 hours.
Tap water usually ok. Chlorine is going to prevent molds from taking to your grains.
Germinate
Drain and spread the grain out so that air can circulate around the grains. We need to keep the grain moist, so spray with water if they are getting dry. Not too much water at this phase.
In a few days the grain will sprout. If you are curious, take a razor blade and slice a few kernles open. You will see the shoot or acrospire starting to grow. When the acrospire pokes out of the husk you are half way there!
Let the rootlet reach a length of 2 times the size of the seed. This will have to be an approximation as not all of your grain will germinate at the same rate. When the majority of your modified grains are sprouted it is time to dry.
Drying
Spread the grain on a dark surface outside, say black plastic garbage bags and let the sun dry them. Spread them thinly. They will dry in one to two days in the sun. Watch out for the birds! Maybe a net is advisable if the sparrows are a problem there.
It's important to note that the grains should not dry out at a high temperature. We're looking at about 50ºC until it is dry. Two days in the sun should do the trick. Once the malted grain is dry, you can increase the temperatures and leave the valuable enzymes in tact.
The last step of the drying process involves more heat than the sun alone can produce. Spread the dried grains on a big baking sheet and pop them in your oven to finish them off. This will bring the moisture content below 10% which is ideal for storage. I don't have an oven, but I have a solar oven.
Roasting
If you want to roast a few kilos of malt to create some different darker malts, put a half kilo in a big wok and stir them over the gas cooker. They will smoke so keep tossing them. When they are the desired darkness, dump them in a pot and add some more to the wok. This is smoky business, but roasting malt smells so yummy (especially if you like dark ales and stouts).
Later I'll talk about the water here.
Friday, March 16, 2007
Filters and Homebrew Group
Good day!
I looked at some water filters and systems yesterday. It was certainly worth looking into getting a filter. The amount of water that is needed for brewing will offset the cost of the filter quite easily. There are the cartridge types that go inline with the water supply or hose, but I think that our water pressure here would make that type a little weak. Filtered water on demand may not be possible as we have no pump, only gravity fed. Some days our 'gravity' is not as good as others. There is also the fact that the cartridges have to be replaced periodically. We have a lot of 'hardness' in our water and I think that the filters would plug up quickly.
The countertop models are quite slow, but they are adequet for our daily water consumption. There were about a dozen to choose from at Ace.
At this point I am going to go with the biggest pot I have and boil up on the mornings of brewing and bottling days.
Yesterday I got a message from another homebrewer in Luzon. So there is another homebrewer in the Philippines! Wow. I also started a homebrew group on Yahoo and did a little setup. The URL is http://groups.yahoo.com/group/homebrewers_philippines. If you found this page from Google or wherever and want to join us, please do. We aim to share as much as we can about the homebrewing hobby.
Today I am making some yogurt. I put the innoculated milk near the computer as the extra heat is just what the little guys need. I have a strain of yogurt that I pass on to the next batch. It's got some L. casei from Yakult in it too. It's super tangy.
Thursday, March 15, 2007
Water and Order Pooling Idea
Today is shopping day and we're off to the big city. I'd like to look at water filters and purification systems and get a price on them. Potable water here comes in the form of 5 gallon jugs, delivered at P40 each. At a couple of jugs a week it ads up over a year.
I.e. 52 x P80 = P4,160.
OK, that's only about US$80 a year.
The supplied water (tap water) is very cheap, but not good for cooking or drinking. A filter could pay for itself every year if reasonable they are in price.
I am once more trying to gain some contacts to measure the interest in a homebrew association here in the Philippines. Last night I researched and posted some messages on some of the groups. Hopefully a few expats or pinoys with a homebrew hobby will contact me. So far we have 1 member...me!
I am also tossing the idea around in my head of a 'community purchasing' scheme where a number of members could pool their orders and take advantage of lower prices or shipping costs. Some homebrew shops have discounts after a certain dollar amount. I know Homebrew Heaven has 10% off if you buy over $250. Pwede.
Ginger ale I bottled yesterday is sitting nicely in bottles. It's a great tasting batch. I primed the bottles with ground ginger, sugar, calamansi juice and water. So far there are no abnormal pressures in any of the bottles. Yes, I used plastic bottles.
Got to go. Blog you later.
Wednesday, March 14, 2007
Sanitation on a Budget
Today I am going to bottle some of my ginger ale (or is ginger wine a better description?) and have the big bucket out and 'am soaking bottles. I have no "official" sanitizing products, only bleach and boiled water.
In the years I've been homebrewing, I have tried some different products, but always ran out of them and used bleach as a stand-by. Now bleach is my main sanitizer.
I hear the pros and cons of different products and some people swear by bleach and have never had a bad batch, while others cringe at the thought of chlorine. Maybe it's because it smells like a swimming pool or reminds people of doing laundry. As long as you rinse your bottles, gear etc. with boiled water you will be fine.
Here is my secret recipe. Use only unscented bleach and use about one teaspoon per litre or water. The water from the tap here is not much good for brewing, but it's ok for cleaning.
What kind of bottles?
I like PET bottles and have some 750ml brown ones. They are nice and light, won't break, are resealable and being brown they block the light from your beer. I have never experienced any "plastic" flavors with these bottles. I have had a few "leakers" and the caps need to be cranked on tight sometimes.
Whatever you can arrange for bottles is usually ok. Beer and light do not agree, so if you use clear bottles, keep them out of the light. In a closed cardboard box, in the back of the cupboard or wherever.
If you are using glass bottles please be very careful and know when your beer is fully attenuated (aka the yeast is done!) before priming and bottling.
For bottling day, sometimes a big bucket, several buckets or better yet a plastic garbage can will do for the soak. I have a garbage can that holds about 45l of water. I think it's 10 US gallons and does nicely for soaking everything for bottling a 23l (5US gallons) batch of brew. Depending on your bottles, you may be soaking and rinsing 70 small bottles or about 30 - 750ml or 24 - 1 litre bottles so it's what you have to work with. Here is a quick look at what you'll need to bottle a standard 23l batch or beer.
23 litres of beer needs:
70 - 330ml bottles or
30 - 750ml bottles or
Clean Bottles Only
It's a good idea to have a couple of extra bottles soaking just in case of accidental contamination. The bottles are of course CLEAN already as I am obsessed with rinsing bottles after pouring a glass of beer. If you have alien lifeforms growing in your bottles or their status is "unknown" then a bottle brush, dish soap, warm water and sterilized rinse is a very good idea prior to soaking.
After the bottles have soaked for an hour or two, then can be rinsed with boiled water. The best way to boil water is with a big pot and the gas stove. In a typical bottling day I may use several large pots of boiled water for rinsing. I boil for about 10 minutes to kill any nasties.
If you are using PET (plastic) bottles, DO NOT POUR BOILING WATER ON THEM! They will shrivel and deform from the heat. Let the rinse water cool first. This takes a little time, so get your water boiling early.
I have to go prime the bottles now. Teka lang ha?
Tuesday, March 13, 2007
Podcasts and Hops
I got word from Homebrew Heaven that my order has been shipped! Yeah.
Podcasts
I've been working on some web pages and updating. While I do updates online, I am listening to a podcast from Basic Brewing (see the links on the right column) and it's all about the sense of smell and taste. Very interesting. Each podcast is about 40 to 50 minutes and there are dozens to listen to.
Hop to the Hops
I am happy to know that my hops are on their way. I have a nice selection of both bittering and finishing hops coming. I opted for pellets for ease of use and lower wort absorption, but that's a personal choice.
There are literally dozens of different strains of hops. You'll hear of terms like bittering, alpha acid and finishing hops. Maybe I can clear up a few of these terms for the new homebrewer.
Originally, there was ale. Hundreds of years ago, brewers fermented malted grains in water and the resulting drink was lacking that bitter tang and aroma that we associate with beers today. That tang comes from the addition of hops to the brew. Hops are flowers from the humulus lupulus vine. They have been used for centuries as the base of teas and tonics and for good reason. Hops contain a host of chemicals, anti-bacterial and preservative properties.
When the old ales were spiced with hops, the true beer (bier) was born.
The IPAs (India Pale Ale) of years ago were preserved with massive amounts of hops to survive the long journey from England to India. This storage of beer with hops produces bitter beer that was more satisfying to warm climate drinkers.
Hops contain alpha acids. Alpha acids produce the bitterness and are expressed as a percentage. For example 4% or 14%, where 4% is a low alpha acid and 14% is a high alpha acid level. Low alpha acid hops are generally used for aroma and flavoring. High alpha acid hops are boiled with the wort and the amount of alpha acids and the duration of the boil determine the bitterness of the beer. Normally a recipe will call for a finishing (low alpha acid) hop near the end of the boil to give that fresh, pine, spice or herbal aroma.
Hops come in several packaging formats but are commonly sold as whole dried hop flowers and hop pellets. I prefer pellets for convenience, but everyone has their ideas and ways of doing things.
I have ordered a nice blend of both bittering and finishing hops including: Cascade, Mt. Hood, Simcoe and Magnum.
Some recipes include a "hop schedule." A hop schedule is nothing more that a list of what hops, when and how much.
Hops can vary from year to year, place to place and of course variety to variety. In some years the alpha acid may be lower or higher than other years. Homebrewers have taken this bit of inconsistency into account and have a system of bitterness units, called HBUs. By calculating the HBU required, we can adjust the amount of hops used to create a consistent beer no matter what the hops this season are like. I'll go into HBUs and IBUs later in the blog.
Common Hops and Their Usage
Brewer's Gold - High alpha acid, coarse flavor and aroma. Used primarily in stouts.
Cascade - Low alpha acid, nice aroma but coarser in flavor than the true noble hops. Common for light lagers and dark beers.
Cluster - An old American variety, moderate alpha acid, low aromatic.
Cascade was bred as a replacement. Popular bittering hop for US breweries.
Eroica - High alpha acid, good aroma. Appropriate for dark ales and stouts.
Fuggle - A noble British hop. Good for all ales.
Galena - Very high alpha acid, coarse flavor. Good bittering hop.
Golding (Kent) - The other noble British strain.
Good finishing hop.
Hallertauer - A noble German hop. Excellent for all lagers.
Hersbrucker - Another German noble hop. Excellent for lagers as well.
Northern Brewer - Medium to high alpha acids, but with good flavor and aroma. Excellent choice for all dark ales. Is used in pale ales and dark lagers as well.
Saaz - The noble Bohemian hop. The Pilsener hop. Excellent finishing hop.
Tettnanger - Noble German hop. Excellent aroma, mild flavor. Appropriate for all lagers.
Willamette - American Fuggles clone. Good finishing hop.
There is one other thing that I want to touch on and that is dry hopping. Dry hopping is adding hops to the wort just before fermenting. This gives the freshest taste. I have floated whole hops on top of my wort for two weeks and wow what a wonderfully smelling and tasting beer it was.
Hops leave us many opportunities to experiment with flavor and aroma to create the style of beer we want.
Cheers!
Subscribe to:
Posts (Atom)
